Sphinx 文档目录
欢迎
Sphinx 是一种文档工具,它可以令人轻松的撰写出清晰且优美的文档, 由 Georg Brandl 在BSD 许可证下开发. 新版的Python文档 就是由Sphinx生成的, 并且它已成为Python项目首选的文档工具,同时它对 C/C++ 项目也有很好的支持; 并计划对其它开发语言添加特殊支持. 本站当然也是使用 Sphinx 生成的,它采用reStructuredText! Sphinx还在继续开发. 下面列出了其良好特性,这些特性在Python官方文档中均有体现:
- 丰富的输出格式: 支持 HTML (包括 Windows 帮助文档), LaTeX (可以打印PDF版本), manual pages(man 文档), 纯文本
- 完备的交叉引用: 语义化的标签,并可以自动化链接函数,类,引文,术语及相似的片段信息
- 明晰的分层结构: 可以轻松的定义文档树,并自动化链接同级/父级/下级文章
- 美观的自动索引: 可自动生成美观的模块索引
- 精确的语法高亮: 基于 Pygments 自动生成语法高亮
- 开放的扩展: 支持代码块的自动测试,并包含Python模块的自述文档(API docs)等
Sphinx 使用 reStructuredText 作为标记语言, 可以享有 Docutils 为reStructuredText提供的分析,转换等多种工具.
引言
该文档是Sphinx建立文档的参考. Sphinx 将 reStructuredText 源文件集转换为丰富的输出格式,并自动产生参考文献、索引等. 简言之,如果你有一个包含reST-格式的文档的目录(包含文档的所有文件或子目录), Sphinx 会生成组织合理的HTML文件(在另一个目录里),使得浏览及导航功能使用非常方便. 通用一份源文件,你可以生成LaTeX 文件,然后编译成 PDF 版本的文档, 也可以直接使用 rst2pdf 生成PDF 文件.
重点讨论的是手写文档而不是自动生成的API文档. 但是我们对于两种都支持的很好,甚至支持两种内容混合的文档, 假如你需要纯净的API文档,查看 Epydoc, 它可以解析 reST.
不同文档系统的转换
这一节搜集了一些有用的提示,帮助我们从其他的文档系统迁移到reStructuredText/Sphinx.
- Gerard Flanagan (人名)写了一个脚本把纯净的HTML转换为 reST文本; 你可以到 Python 索引页 查看.
- 原来的Python文档转换为 Sphinx, 代码托管在 the Python SVN repository. 它包含将Python-doc-style LaTeX 标记转换为Sphinx reST 的生成代码.
- Marcin Wojdyr 写了一个脚本,将 Docbook 转换为 reST ; 可查看 Google Code.
- Christophe de Vienne 写了一个将 Open/LibreOffice 文档转换为 Sphinx的工具: odt2sphinx.
- 转换不同的标记语言, Pandoc 也是一个非常有用的工具.
在其他系统中使用
前提
Sphinx 运行前需要安装 Python 2.4 或者 Python 3.1 , 以及 docutils 和 Jinja2 库. Sphinx 必须工作在 0.7 版本及一些 SVN 快照(不能损坏). 如果需要源码支持高亮显示,则必须安装 Pygments 库.
如果使用 Python 2.4 ,还需要 uuid.
用法
更深入的话题,请参考 Sphinx初尝 .
Sphinx初尝
此文档是Sphinx使用的综览性教程,包含Sphinx常用的任务处理.
绿色箭头链接了任务操作的详细信息.
配置文档源
文档集的根目录叫 source directory. 该目录也包含了 Sphinx 的配置文件 conf.py, 在这里你可以配置Sphinx各个方面,使Sphinx按照你的要求读取源文件并创建文档. [1]
Sphinx 有个脚本叫做 sphinx-quickstart ,它可以帮你建立源目录及默认配置文件 conf.py ,它通过几个简单的问题获取一些有用的配置值.
你仅需要运行
$ sphinx-quickstart
然后回答这些问题. (其中”autodoc” 扩展选项请选中.)
它也会自动匹配 “API 文档” 生成器 sphinx-apidoc; 详细信息请参考 调用 sphinx-apidoc.
定义文档结构
假定你已经运行了 sphinx-quickstart . 它创建了源目录,包含 conf.py
及一份主文档 index.rst (如果你接受了默认选项).主文档 master document 的主要功能是被
转换成欢迎页, 它包含一个目录表( “table of contents tree”或者 toctree ). Sphinx 主要功能是使用
reStructuredText, 把许多文件组织成一份结构合理的文档.
toctree 指令初始为空, 如下:
.. toctree::
   :maxdepth: 2
你可以在 content 的位置添加文档列表:
.. toctree::
   :maxdepth: 2

   intro
   tutorial
   ...
以上精确展示toctree 与文档的转换. 所有的文档以文件名 document names的形式给出, 不需文件后缀名;使用斜线作为目录分隔符.
 更多信息请查看 the toctree directive.
现在可以创建toctree指令后的文件及目录了,
它们的章节标题被插入到toctree指令的位置 (与 “maxdepth” 同一缩进) . 现在Sphinx已知道文档的分层结构.
(toctree指令后的文件也可以有 toctree 指令, 会生成更深的层次结构.)
添加内容
在Sphinx源文件里, 可以使用reStructuredText的很多特性.
也有些特性被添加到Sphinx中. 例如, 可以引用参考文件链接 (对所有输出类型均有效) ,使用 ref 角色.
又如, 浏览HTML版本时想要查看文档的源文件,只需点击边框栏的”显示源代码”.
- reStructuredText 简介 详细介绍了reStructuredText
- Sphinx标记的组成 列出了Sphinx添加的全部标记.
运行创建工具
现在已经添加了一些文件,下面可以创建文档了. 创建工具 sphinx-build , 使用方式
$ sphinx-build -b html sourcedir builddir
sourcedir 是源目录 source directory , builddir 则是放置生成的文档的根目录. -b 是创建工具的选项;这个例子创建HTML文件.
调用 sphinx-build 列出工具 sphinx-build
支持的所有选项.
- 而且, sphinx-quickstart 脚本创建的
Makefile和 make.bat使操作更容易,仅需运行$ make html
创建 HTML 在设定好的目录里. 执行 make 将不需要任何参数.
怎样产生PDF 文档?
make latexpdf 运行在 LaTeX builder ,点击可以获取pdfTeX工具链.
文档对象
Sphinx的对象 objects (一般含义)在任何 domain (主域)里是指简单的文档. 一个主域包含所有的对象类型,
完整的生成标记或引用对象的描述.
最著名的主域是Python 主域. Python文档建立函数 enumerate() , 在源文件里添加:
.. py:function:: enumerate(sequence[, start=0])

   返回一个迭代器,输出包含索引及*sequence*里所有条目的元组.
返回形式为:
-
enumerate(sequence[, start=0]) 返回一个迭代器,输出包含索引及*sequence*里所有条目的元组
指令的参数是对象的描述标示 signature , 内容是对它的说明.同一行可以写多个参数.
Python 主域通常是默认的, 因此不需要特别标记出主域的名字:
.. function:: enumerate(sequence[, start=0])

   ...
以上在默认主域配置下效果是等同的.
对不同的Python 对象有不同的指令,
如 py:class 或者 py:method . 不同的对象类型有不同的引用角色 role .
这个标记将创建链接到文档的 enumerate()
这个 :py:func:`enumerate` 函数用于 ...
这是一个实例: 可链接 enumerate() .
同样如果默认为 Python 主域 py: 可以省略. 但这不重要,Sphinx会自动发现包含 enumerate() 的文件并且链接.
不同主域对于不同标示有特定的角色,以使输出格式更美观,在C/C++ 主域里增加了链接到元素类型的角色.
Sphinx Domains 列出所有主域及其指令/角色.
基本配置
前面提到的文件 conf.py ,控制着Sphinx怎样生成文档.
这个文件以Python 源文件的形式执行你的配置信息 .
高级的使用者则通过Sphinx使其执行, 可以配置它实现不平凡的任务, 例如继承 sys.path 或者导入
模块标示文档的版本.
仅需要修改 conf.py ,可以改变默认值, 删除一些符号,修改对应的值.
(通过标准的 Python 操作符: # 为注释行).或者通过 sphinx-quickstart 初始化一些值.
自定义的配置一般不会由 sphinx-quickstart 自动产生,需要自己添加标记.
记住此文件使用Python 的操作符及字符串、数字、列表等.这个文件默认保存为UTF-8编码, 首行需要添加编码声明.
插入非ASCII字符, 则需要使用Python Unicode 字符串 (如 project = u'Exposé' ).
详情查看 The build configuration file .
自动文档
Python 源代码的文档字符串一般放置了许多的说明信息. Sphinx 支持自动摄取这些说明信息, 使用 “autodoc”的扩展 extension (标准的Python模块扩展,为Sphinx提供的附加功能).
使用autodoc, 需在配置里激活,在 conf.py 放入字符串 'sphinx.ext.autodoc'
位置在 :confval:`extensions` 配置值列表. 现在已配置了一些附加指令.
如,文档化函数 io.open() ,读取源码的标示及文档字符串,这样写:
.. autofunction:: io.open
也可以读取整个类或模块, 使用选项
.. automodule:: io
   :members:
autodoc 需要导入到你的模块以便索取文档字符串.
因此,在 conf.py 需要为 sys.path 添加合适的路径.
详情请参考 sphinx.ext.autodoc .
其他话题
- 其他扩展 (math, intersphinx, viewcode, doctest)
- 静态文件
- 选择主题
- 模板
- 使用扩展
- 写扩展
尾注
| [1] | 这只是一般情况. conf.py 可以被移动到其他目录,请参考 configuration directory 及 调用 sphinx-build . |
调用 sphinx-build
脚本 sphinx-build 用来建立Sphinx文档集. 调用方式:
$ sphinx-build [options] sourcedir builddir [filenames]
sourcedir 是源文件目录 source directory , builddir 是生成文件目录.一般不需要写 filenames .
脚本 sphinx-build 的选项:
-
-b生成器名字 生成器,决定了生成文档的类型,是最重要的选项. 通用的生成器有:
- html
- 生成HTML文档. 默认的生成器.
- dirhtml
- 生成HTML文档,但是每个文档都有单一的目录,在用浏览器访问时有漂亮的URLs (没有后缀
.html) . - singlehtml
- 所有内容生成单一的 HTML .
- htmlhelp, qthelp, devhelp, epub
- 生成HTML文档,建立文档集时包含这些类型之一的额外信息.
- latex
- 生成 LaTeX 源,可使用 pdflatex 将其编译成 PDF 文档.
- man
- 生成UNIX系统的groff格式手册.
- texinfo
- 生成 Texinfo 文件,可以使用 makeinfo 产生Info 文件.
- text
- 生成纯文本文件.
- gettext
- 生成 gettext-style 分类信息 (
.pot文件). - doctest
- 运行文档集内所有测试,如果
doctest扩展可用. - linkcheck
- 检查所有外部链接的可信度.
查看 Available builders ,列出了Sphinx支持的所有生成器及 其可添加的扩展.
-
-a 给出时重写全部文档,默认则仅重新生成有新的源文件或源文件被修改的文档.(不适用于所有生成器.)
-
-E 不使用保存的 environment (环境,缓存了所有的参考索引), 而是完全重建. 默认仅读取和解析最近新添加及改动的源文件.
-
-ttag 定义标签 tag. 与
only指令相关,标签是一个目录集合,仅处理标签目录中的内容.New in version 0.6.
-
-d路径 目前Sphinx生成输出前会读取和解析所有的源文件, 解析过的源文件被缓存成 “doctree pickles”. 通常,这些文件被放在生成目录的
.doctrees文件夹中; 这个选项可以选择不同的缓存目录( doctrees 可以被所有的生存器共享).
-
-c路径 不使用源目录下的
conf.py而是使用指定的配置文件. 注意在配置文件中提及的路径都是相对配置文件所在目录的相对路径,因此路径必须一致.New in version 0.3.
-
-C 不查找配置文件,仅使用选项
-D的配置.New in version 0.5.
-
-Dsetting=value 覆盖
conf.py里的配置值. value 是一个字符串或字典. 例如:-D latex_elements.docclass=scrartcl. 布尔值使用0或1代替.Changed in version 0.6: 值可以为一个字典.
-
-Aname=value 模板里的 name 变量使用 value 值代替.
New in version 0.5.
-
-n 采用 nit-picky 模式. 该模式下所有错误都会产生警告信息.
-
-N 不产生彩色输出. (在 Windows, 彩色输出一直是不可用的.)
-
-q 不产生标准输出,仅使用标准错误输出输出警告和错误信息.
-
-Q 不产生标准输出,也不产生警告信息,仅使用标准错误输出输出错误信息.
-
-wfile 除标准错误输出外,将警告(错误)输出到指定文件.
-
-W 将警告视为错误.产生第一个警告就停止文档生成活动,
sphinx-build在状态1 退出.
-
-P 发生未绑定的异常时运行Python 调试器
pdb.(仅在调试时使用.)
源目录与目标目录后面,可以给出一个到多个文件名. Sphinx会尝试仅生成这些文件(及其依赖文件).
调用 sphinx-apidoc
程序 sphinx-apidoc 将Python页面自动生成API文档.调用方式:
$ sphinx-apidoc [options] -o outputdir packagedir [pathnames]
这里 packagedir 是生成文档的页面的根目录, outputdir 则是生成源文件的输出目录. pathnames 给出的路径在生成时不会被忽略.
脚本 sphinx-apidoc 也有一些选项:
-
-ooutputdir 给出文档页的根目录.
-
-f,--force 通常sphinx-apidoc 不会重写任何文件. 使用该项强制重写所有文件.
-
-n,--dry-run 采用该选项,将不会产生任何文件.
-
-ssuffix 生成文件的后缀名,默认为
rst.
-
-dmaxdepth 目录的最大层次.
-
-T,--no-toc 避免生成文件
modules.rst. 当有选项--full时不起作用.
-
-F,--full 创建整个 Sphinx 项目, 与 sphinx-quickstart 使用一样的机制. 大多数配置值被设置为默认,可通过下面选项去修改.
-
-Hproject 设置项目名 (查看 :confval:`project`).
-
-Aauthor 设置作者名 (查看 :confval:`copyright`).
-
-Vversion 设置文档版本 (查看 :confval:`version`).
-
-Rrelease 设置文档的发布版本 (查看 :confval:`release`).
reStructuredText 简介
本章节介绍 reStructuredText (reST) 的概念和语法,为文档生成者提供足够的信息. reST 被认为是简单,实用的标记语言,因此学习它不会花太多时间.
See also
读物 reStructuredText User Documentation. 文档内 “ref” 链接指向reST的分类参考文献.
段落
段落 (:duref:`ref <paragraphs>`) 是reST 文件的基本模块. 段落是由空行分隔的一段文本. 和Python一样, 对齐也是reST的操作符, 因此同一段落的行都是左对齐的.
内联标记
标准的reST 内联标记相当简单:
- 星号:
*text*是强调 (斜体), - 双星号:
**text**重点强调 (加粗), - 反引号:
``text``代码样式.
星号及反引号在文本中容易与内联标记符号混淆,可使用反斜杠符号转义.
标记需注意的一些限制:
- 不能相互嵌套,
- 内容前后不能由空白: 这样写``* text*`` 是错误的,
- 如果内容需要特殊字符分隔. 使用反斜杠转义,如:
thisis\ *one*\ word.
这些限制在未来版本可能会被改善.
reST 也允许自定义 “文本解释角色”’, 这意味着可以以特定的方式解释文本.
Sphinx以此方式提供语义标记及参考索引,操作符为 :rolename:`content`.
标准reST 提供以下规则:
- :durole:`emphasis` – 写成
*emphasis* - :durole:`strong` – 写成
**strong** - :durole:`literal` – 写成
``literal`` - :durole:`subscript` – 下标
- :durole:`superscript` – 上标
- :durole:`title-reference` – 书、期刊等材料的标题
详情请查看 内联标记 .
列表与引用
列表标记 (:duref:`ref <bullet-lists>`) 的使用最自然: 仅在段落的开头放置一个星号和一个缩进.
编号的列表也可以;也可以使用符号 # 自动加序号:
* 这是一个项目符号列表.
* 它有两项,
  第二项使用两行.

1. 这是个有序列表.
2. 也有两项.

#. 是个有序列表.
#. 也有两项.
列表可以嵌套,但是需跟父列表使用空行分隔
* 这是
* 一个列表

  * 嵌套列表
  * 子项

* 父列表继续
定义列表 (:duref:`ref <definition-lists>`)
术语 (term 文本开头行)
   定义术语,必须缩进

   可以有多段组成

下一术语(term)
   描述.
一行仅能写一个术语.
引用段落 (:duref:`ref <block-quotes>`) 仅使用缩进(相对于周围段落)创建.
行模块 (:duref:`ref <line-blocks>`) 可以这样分隔
| 这些行
| 在源文件里
| 被分隔的一模一样.
还有其他有用的模块:
- 字段列表 (:duref:`ref <field-lists>`)
- 选项列表(:duref:`ref <option-lists>`)
- 字面引用模块 (:duref:`ref <quoted-literal-blocks>`)
- 文档测试模块 (:duref:`ref <doctest-blocks>`)
源代码
字面代码块 (:duref:`ref <literal-blocks>`) 在段落的后面使用标记 :: 引出.
代码块必须缩进(同段落,需要与周围文本以空行分隔):
这是一段正常文本. 下一段是代码文字::

   它不需要特别处理,仅是
   缩进就可以了.

   它可以有多行.

再是正常的文本段.
这个 :: 标记很优雅:
- 如果作为独立段落存在,则整段都不会出现在文档里.
- 如果前面有空白,则标记被移除.
- 如果前面是非空白,则标记被一个冒号取代.
因此上面的例子第一段文字将变为”下一段是代码文字:”.
表格
支持两种表格. 一种是 网格表格 (:duref:`ref <grid-tables>`), 可以自定义表格的边框. 如下:
+------------------------+------------+----------+----------+
| Header row, column 1   | Header 2   | Header 3 | Header 4 |
| (header rows optional) |            |          |          |
+========================+============+==========+==========+
| body row 1, column 1   | column 2   | column 3 | column 4 |
+------------------------+------------+----------+----------+
| body row 2             | ...        | ...      |          |
+------------------------+------------+----------+----------+
简单表格 (:duref:`ref <simple-tables>`) 书写简单, 但有一些限制: 需要有多行,且第一列元素不能分行显示,如下:
=====  =====  =======
A      B      A and B
=====  =====  =======
False  False  False
True   False  False
False  True   False
True   True   True
=====  =====  =======
超链接
外部链接
使用 `链接文本 <http://example.com/>`_ 可以插入网页链接.
链接文本是网址,则不需要特别标记,分析器会自动发现文本里的链接或邮件地址.
可以把链接和标签分开 (:duref:`ref <hyperlink-targets>`), 如下:
段落里包含 `a link`_.

.. _a link: http://example.com/
内部链接
内部链接是Sphinx特定的reST角色, 查看章节 交叉索引的位置.
章节
章节的标题 (:duref:`ref <sections>`) 在双上划线符号之间(或为下划线), 并且符号的长度不能小于文本的长度:
=================
This is a heading
=================
通常没有专门的符号表示标题的等级,但是对于Python 文档,可以这样认为:
#及上划线表示部分*及上划线表示章节=, 小章节-, 子章节^, 子章节的子章节", 段落
当然也可以标记(查看 reST 文档), 定义章节的层次,但是需要注意输出格式(HTML, LaTeX)所支持的层次深度 .
显式标记
显式标记”Explicit markup” (:duref:`ref <explicit-markup-blocks>`) 用在那些需做特殊处理的reST结构中, 如尾注,突出段落,评论,通用指令.
显式标记以 .. 开始,后跟空白符,与下面段落的缩进一样.
(在显示标记与正常的段落间需有空行,这听起来有些复杂,但是写起来会非常直观.)
指令
指令 (:duref:`ref <directives>`) 是显式标记最常用的模块. 也是reST 的扩展规则, 在 Sphinx 经常被用到.
文档工具支持以下指令:
警告: :dudir:`attention`, :dudir:`caution`, :dudir:`danger`, :dudir:`error`, :dudir:`hint`, :dudir:`important`, :dudir:`note`, :dudir:`tip`, :dudir:`warning` 及通用标记 :dudir:`admonition`. (大多数模式仅支持 “note” 及 “warning” )
图像:
- :dudir:`image` (详情可看下面的 图像 )
- :dudir:`figure` (有标题及可选说明的图像)
额外的主体元素:
- :dudir:`contents <table-of-contents>` (本地,仅是当前文件的内容表格)
- :dudir:`container` (自定义容器,用来生成HTML的
<div>) - :dudir:`rubric` (和文档章节无关的标题)
- :dudir:`topic`, :dudir:`sidebar` (高亮显示的主体元素)
- :dudir:`parsed-literal` (支持内联标记的斜体模块)
- :dudir:`epigraph` (可选属性行的摘要模块)
- :dudir:`highlights`, :dudir:`pull-quote` (有自己的类属性的摘要模块)
- :dudir:`compound` ( 复合段落)
专用表格:
- :dudir:`table` (有标题的表格)
- :dudir:`csv-table` (CSV自动生成表格)
- :dudir:`list-table` (列表生成的表格)
专用指令:
- :dudir:`raw` (包含原始格式的标记)
- :dudir:`include` (包含reStructuredText标记的文件) – 在Sphinx中,如果包含绝对文件路径,指令会以源目录地址做为参照
- :dudir:`class` (将类属性指派给下一个元素) [1]
HTML 特性:
- :dudir:`meta` (生成HTML
<meta>标签) - :dudir:`title` (覆盖文档标题)
- :dudir:`meta` (生成HTML
影响标记:
- :dudir:`default-role` (设置新的默认角色)
- :dudir:`role` (创建新的角色)
如果仅有一个文件,最好使用 :confval:`default_role`.
设置不使用指令 :dudir:`sectnum`, :dudir:`header` 及 :dudir:`footer`.
Sphinx 新增指令可查阅 Sphinx标记的组成.
指令有名字,参数,选项及内容组成. (记住这些,在下面一小节中自定义指令里会用到).来看一个例子:
.. function:: foo(x)
              foo(y, z)
   :module: some.module.name

   返回用户输入的一行文本.
function 是指令名字. 在第一行和第二行给出了两个参数, 及一个选项 module (如你所见,选项在参数后给出,由冒号引出).
选项必须与指令有一样的缩进.
指令的内容在隔开一个空行后,与指令有一样缩进.
图像
reST 支持图像指令 (:dudir:`ref <image>`), 如下:
.. image:: gnu.png
   (选项)
这里给出的文件名( gnu.png) 必须是源文件的相对路径,如果是绝对路径则以源目录为根目录.
例如,在文件 sketch/spam.rst 引用图像 images/spam.png ,则使用 ../images/spam.png 或者
/images/spam.png.
Sphinx 会自动将图像文件拷贝到输出目录的子目录里,( 输出HTML时目录为 _static )
图像的大小选项 (width 及 height) :
如果没有单位或单位为像素, 给定的尺寸信息仅在输出通道支持像素时才有用 ( 如输出LaTeX 没用).
其他单位在输出(如 pt )HTML、LaTeX 时被用到.
Sphinx 延伸了标准的文档化行为,只需在后面加星号:
.. image:: gnu.*
上面这样写,Sphinx 会搜索所有名字匹配的图像,而不管图像类型.
每个生成器则会选择最合适的图像.
一般,在源文件目录里文件名 gnu.* 会含有两个文件 gnu.pdf
和 gnu.png , LaTeX 生成器会选择前者,而HTML 生成器则匹配后者.
Changed in version 0.4: 添加对文件名以星号结束的支持.
Changed in version 0.6: 图像路径可以是绝对路径.
尾注
尾注 (:duref:`ref <footnotes>`), 使用 [#name]_ 标记尾注的位置,
尾注的内容则在文档底部红色标题”Footnotes”的后面 , 如下:
Lorem ipsum [#f1]_ dolor sit amet ... [#f2]_

.. rubric:: Footnotes

.. [#f1] 第一条尾注的文本.
.. [#f2] 第二条尾注的文本.
你也可以使用数字尾注 ([1]_) 或使用自动排序的([#]_).
引用
支持标准的reST 引用 (:duref:`ref <citations>`) , 且新增了”global”特性, 所有参考文献不受所在文件的限制. 如:
Lorem ipsum [Ref]_ dolor sit amet.

.. [Ref] 参考文献, 书,URL 等.
引用的使用同尾注很相近,但是它们没有数字标签或以 # 开始.
替换
reST 支持替换 “substitutions” (:duref:`ref <substitution-definitions>`), 有一小段文本或标记被关联到 |name|.
定义与尾注一样需有明确的标记块,如下:
.. |name| replace:: replacement *text*
或者:
.. |caution| image:: warning.png
             :alt: Warning!
详情查看 :duref:`reST reference for substitutions <substitution-definitions>` .
如果想在所有文档中使用这些替换, 需把它们放在 :confval:`rst_prolog` 或一个单独文件里,
然后在使用它们的文档文件里包含这个文件,包含指令 include .
(请给出包含文件的扩展名,已区别于其他的源文件,避免Sphinx将其作为独立的文档文件.)
Sphinx 定义了一些默认的替换, 请查看 替换.
评论
有明确标记块但又不是有效的结构标记的标记 (像上面的尾注)都被视为评论 (:duref:`ref <comments>`). 例如:
.. 这是一个评论.
可以通过缩进产生多行评论:
..
   这整个缩进块都是
   一个评论.

   仍是一个评论.
源编码
在reST使用Unicode字符可以容易的包含特殊字符如破折号,版权标志. Sphinx 默认源文件使用UTF-8 编码; 你可以通过 :confval:`source_encoding` 的配置值改变编码.
常见问题
具体使用中可能会遇到一些问题:
- 内联标记的分离 如上面所讲,内联标记需与周围的文本使用空格分隔, 内联标记内部则使用反斜线转义空格. 查看详情: the reference .
- 内联标记不能嵌套 像这样写
*see :func:`foo`*是不允许的.
Footnotes
| [1] | 当默认主域里包含指令 class , 这个指令将被隐藏
因此, Sphinx使用 rst-class. |
Sphinx标记的组成
Sphinx 在 standard reST markup 基础上新增了许多指令和文本解释角色. 本章节是这些特性的参考资料.
目录树
目前 reST 还没有专门的语法表示文件的相互关联或怎样将一份文档拆分成多个输出文件,
Sphinx 使用自定义的指令在独立文件里添加这种关系或目录表格.
指令 toctree 是其核心元素.
Note
简单的在一个文件里包含另一个文件也可以完成包含指令 :dudir:`include` .
-
.. toctree:: 该指令在当前位置插入一个目录树 “TOC tree” ,在文档中使用独立的 TOCs (包括 “sub-TOC trees”)给出指令的主体. 相对文件名 (不以缩写开头) 是指令所在的文件的相对路径,绝对文件名则以源目录为根目录. 数值
maxdepth选项指定目录的层次,默认包含所有的层次. [1]下面是一个例子 (以Python文档库作为参考):
.. toctree::
   :maxdepth: 2

   intro
   strings
   datatypes
   numeric
   (更多的文档列在下面)
它实现了两种功能:
- 插入所有文档的目录表格,深度为2表示文档必须有一个标题.
这些文档内的指令
toctree也会被插入. - Sphinx 确定了
intro,strings这几个字符串在文档中的相对顺序,并知道它们是本文档的子页面,是文档库的索引. 根据这些信息可产生 “下一个主题”, “上一个主题” 及 “父页面” 的链接.
条目
目录树里的标题是由
toctree指令自动罗列其包含文档的标题. 如果不合适, 可以使用与reST超链接相似的标签符号自定义一个标题,(或使用Sphinx的 cross-referencing syntax). 如下:.. toctree:: intro All about strings <strings> datatypes
上面的第二行中
strings是文档名, 但是在目录树里会使用 “All about strings” 作为标题名.也可以添加外部链接,只要使用HTTP URL 代替文档名就可以了.
章节编号
如果希望在HTML为章节编号,仅需给出选项
numbered. 例如:.. toctree:: :numbered: foo bar
编号以标题
foo开始.子目录也会自动编号 (不需在给出numbered选项).也可以定义编号的深度, 需在
numbered后给出深度的参数.其他选项
如果希望目录里仅出现文档的标题,不出现文中其他同等级的标题行(同一缩进), 可以使用选项
titlesonly.. toctree:: :titlesonly: foo bar
使用匹配指令 “globbing” , 只需给出
glob选项. 可用文档列表里的所有条目都会被匹配, 并且按照字母顺序插入 . 例如:.. toctree:: :glob: intro* recipe/* *
以上会包含所有以
intro开头的文档及recipe目录下的所有文件,第三行匹配所有剩下的文件 (除了包含该目录树指令的文件,即当前文件.) [2]特殊名字
self可以代替当前文件. 这在从目录树生成导航地图( “sitemap” )时非常有用.还可以给出 “hidden” 选项, 如下:
.. toctree::
   :hidden:

   doc_1
   doc_2
文件仍会存在于Sphinx 的文档结构中,但是不会在当前指令位置插入目录 – 其后可以按照特定的方式插入该文件的链接,比如在HTML边框栏里.
最后, 在 source directory (包括子目录)里的所有文件都需出现在某个
toctree指令里; 否则Sphinx会报出警告, 因为该文件没有通过标准导航. 可以使用 :confval:`unused_docs` 排除某些文件,使用 :confval:`exclude_trees` 排除整个目录.主文档( “master document” )(由 :confval:`master_doc` 指定) 是整个目录结构的根. 可以作为文档的主页面, 如果不给出
maxdepth选项,则会是”填满目录内容的表格”.Changed in version 0.3: 增加 “globbing” 选项.
Changed in version 0.6: 增加 “numbered” 及 “hidden” 选项,及外部链接,支持”self” 关键字.
Changed in version 1.0: 增加 “titlesonly” 选项.
Changed in version 1.1: 增加”numbered”选项的数值参数 .
- 插入所有文档的目录表格,深度为2表示文档必须有一个标题.
这些文档内的指令
预留名子
Sphinx 有些保留的文档名; 试图创建这些名字的文档会产生错误.
这些特殊的文档名 (生成的页面) 有:
genindex,modindex,search分别对应通用索引, Python模块索引, 及搜索页面 .
通用索引封装了模块条目,所有 object descriptions 生成的索引, 及
index指令生成的索引.Python模块索引包含每个
py:module指令生成的索引.搜索页面包含的表单使用JSON格式的搜索索引,然后JavaScript根据输入的搜索词, 全文搜索整个文档;因此,需要工作在支持现代JavaScript的浏览器中.
名字以
_开头尽管仅有少数预留的文档名还被使用, 但是最好不要创建同名文档或在文档路径中包含这些名字. (使用
_前缀定义模板路径是个好方法.)
Footnotes
| [1] | 选项 maxdepth 不适用于 LaTeX , 其在文档开始部分就会出现包含所有文件的目录表,
它的深度使用 tocdepth 计数器控制, 可以使用 :confval:`latex_preamble` 重新配置,例如 \setcounter{tocdepth}{2}. |
| [2] | 所有可以使用的匹配符号: 标准 shell 表达式如 *, ?, [...] 及 [!...] ,但其不匹配斜杠.
使用双星号 ** 可以匹配任何包含斜杠的字符串. |
段落级别的标记
这个指令可以创建简单的段落,也可以如普通文本一样使用内部信息单位:
-
.. note:: 显示用户使用API时的注意事项. 指令的内容应该使用完整的语句及标点符号.
例如:
.. note::

   该功能不适于发送垃圾邮件.
-
.. warning:: 显示用户使用API时的注意事项. 指令包含完整的句子和标点符号. 不同于
note,它一般显示的是信息安全方面的注意事项.
-
.. versionadded::version 标示某个版本或C语言的API 新增的特性. 应用在模块条目时,会放置在章节内容的前面.
第一个参数必须给出版本号,可以添加第二个参数组成一个简单的说明.
例如:
.. versionadded:: 2.5
   The *spam* parameter.
注意在指令头和说明中间不能有空行; 这样会使标记语言认为这个模块不是连续的.
-
.. versionchanged::version 与
versionadded相似, 但它描述的是该功能在版本中的更改(新参数,效果改变等).
-
.. deprecated::version 与
versionchanged相似, 描述的是功能的取消. 解释仍可以给出,比如功能的替代方案. 如:.. deprecated:: 3.1 Use :func:`spam` instead.
-
.. seealso:: 许多章节包含模块文档或者扩展文档的参考索引列表.这些列表由指令
seealso创建.指令
seealso通常放在所有子章节的前面.对于HTML文档, 需与主文本分开.指令
seealso内容是reST的定义列表. 例如:.. seealso:: Module :py:mod:`zipfile` 标准模块 :py:mod:`zipfile` 的文档. `GNU tar manual, Basic Tar Format <http://link>`_ 归档文件的文档, 包含 GNU tar 扩展.
一个简单的形式:
.. seealso:: modules :py:mod:`zipfile`, :py:mod:`tarfile`
New in version 0.5: 简单形式.
-
.. rubric::title 该指令用来创建文档标题,但是该标题不出现在文档的目录结构中.
Note
如果标题被”Footnotes”标记出来 (或被其他语言选中), 这个标题在LaTeX会被忽略, 或假定它包含尾注定义,仅创建一个空标题 .
-
.. centered:: 该指令创建居中加粗文本行. 例如:
.. centered:: LICENSE AGREEMENT
Deprecated since version 1.1: 该指令仅在旧版本里声明了. 使用
rst-class代替并添加适当的样式.
-
.. hlist:: 该指令生成水平列表. 它将列表项横向显示并减少项目的间距使其较为紧凑.
生成器需支持水平分布, 这里的
columns选项定义显示的列数,默认为2. 例如:.. hlist:: :columns: 3 * 列表 * 的子 * 项会 * 水平 * 排列
New in version 0.6.
目录表格标记
指令 toctree ,会产生子文档的目录表格, 详见 目录树.
本地目录表, 则使用标准 reST :dudir:`contents directive <table-of-contents>`.
术语
-
.. glossary:: 该指令必然包含一个reST式的定义列表标记,由术语和定义组成. 这些定义其后可被
term引用. 例如:.. glossary:: environment 一个结构,包含信息是所有文档的保存路径,使用的参考文献等. 在解析的阶段使用,因此连续运行时仅需解析新的或修改过的文档. source directory 根路径,包含子目录,包含一个Sphinx工程的所有源文件.
与标准的定义列表相比, 支持多个术语且这些术语可以有内联标记. 可以链接所有术语. 例如:
.. glossary::

   term 1
   term 2
      定义两个术语.
(术语排序时,通过第一个术语决定顺序.)
New in version 0.6: 给出术语指令的
:sorted:选项,则术语就会按照字母自动排序.Changed in version 1.1: 开始支持多术语和术语的内联标记.
语法产品的显示
特殊标记形成了一套语法展示产品. 这些标记很简单,不会试图模型化BNF的各个方面(及其派生形式), 但是提供了足够显示上下文的语法信息,定义符号将以超链接符形式显示. 指令如下:
-
.. productionlist::[name] 该指令后跟一组产品. 每个产品一行,有名字组成,与后面的定义通过冒号分隔. 如果定义有多行,后面的行以冒号开始,且冒号垂直对齐.
productionlist的参数用来区分不同语法产品的列表.在
productionlist指令参数间不允许有空行.定义可以包含别名,以解释文本给出(例如
sum ::= `integer` "+" `integer`) – 这会生成产品别名的参照表. 除了产品列表,还可以使用别名访问token.注意产品内部没有完整的reST解释器, 因此不能避免使用
*或|字符.
下面是Python 参考手册的例子:
.. productionlist::
   try_stmt: try1_stmt | try2_stmt
   try1_stmt: "try" ":" `suite`
            : ("except" [`expression` ["," `target`]] ":" `suite`)+
            : ["else" ":" `suite`]
            : ["finally" ":" `suite`]
   try2_stmt: "try" ":" `suite`
            : "finally" ":" `suite`
展示示例代码
示例的Python源代码或者交互界面都可以使用标准reST模块实现.在正常段落后面跟着 :: 开始,再加上适当缩进.
交互界面需包含提示及Python代码的输出. 交互界面没有特别的标记. 在最后一行输入或输出之后,不应出现空的提示; 这是一个什么都不做的例子:
>>> 1 + 1
2
>>>
语法高亮显示由 Pygments (如果安装) 优雅的显示:
每个源文件都有高亮语言”highlighting language”. 默认是
'python',多数文件会高亮显示 Python 代码段, 可以在 :confval:`highlight_language` 配置.有了Python 高亮显示模块, 交互界面会自动识别并且适当强调显示. 一般Python 代码仅在可解析时高亮显示 (使用默认的Python, 但是零散的代码段比如shell命令等代码块将不会像Python一样高亮显示).
高亮显示语言也可以通过指令
highlight改变,如下:.. highlight:: c
C 语言将会被使用直到下一个
highlight指令.如果文档需展示不同语言片段, 直接使用
code-block指令给出高亮语言:.. code-block:: ruby Some Ruby code.
指令别名也可用于
sourcecode.有效的语言:
none(没有高亮显示)python(默认, :confval:`highlight_language` 没有设置时)guess(让 Pygments 根据内容去决定, 仅支持一些可识别的语言)restc- ... 其他Pygments 支持的语言名.
如果选定语言的高亮显示失败,则模块不会以其他方式高亮显示.
行号
如果安装好, Pygments可以为代码块产生行号.自动高亮显示模块 (以 :: 开始), 行号由指令 highlight 的选项 linenothreshold 管理:
.. highlight:: python
   :linenothreshold: 5
如果代码块多于5行将产生行号.
对于 code-block 模块, 选项 linenos 给出则为独立块生成行号:
.. code-block:: ruby
   :linenos:

   Some more Ruby code.
另外, 选项 emphasize-lines 可以生成特别强调的行:
.. code-block:: python
   :emphasize-lines: 3,5

   def some_function():
       interesting = False
       print 'This line is highlighted.'
       print 'This one is not...'
       print '...but this one is.'
Changed in version 1.1: 添加了``emphasize-lines`` .
包含
-
.. literalinclude::filename 目录里不显示的文件可能被一个外部纯文本文件保存为例子文本. 文件使用指令
literalinclude包含. [1] 例如包含Python源文件example.py, 使用:.. literalinclude:: example.py
文件名为当前文件的相对路径. 如果是绝对路径 (以
/开始), 则是源目录的相对路径.输入标签可以扩展,给出
tab-width选项指定标签宽度.该指令也支持
linenos选项产生行号,emphasize-lines选项生成强调行, 以及language选项选择不同于当前文件使用的标准语言的语言. 例如:.. literalinclude:: example.rb :language: ruby :emphasize-lines: 12,15-18 :linenos:
被包含文件的编码会被认定为 :confval:`source_encoding`. 如果文件有不同的编码,可以使用
encoding选项:.. literalinclude:: example.py :encoding: latin-1
指令支持包含文件的一部分. 例如 Python模块, 可以选择类,函数或方法,使用
pyobject选项:.. literalinclude:: example.py :pyobject: Timer.start
这会包含文件中
Timer类的start()方法后面的代码行.使用
lines选项精确的控制所包含的行:.. literalinclude:: example.py :lines: 1,3,5-10,20-
包含1, 3, 5 到 10 及 20 之后的代码行.
另一种实现包含文件特定部分的方式是使用
start-after或end-before选项 (仅使用一种). 选项start-after给出一个字符串, 第一行包含该字符串后面的所有行均被包含. 选项end-before也是给出一个字符串,包含该字符串的第一行前面的文本将会被包含.可以往包含代码的首尾添加新行,使用
prepend及append选项. 这很有用,比如在高亮显示的PHP 代码里不能包含<?php/?>标签.New in version 0.4.3: 选项
encoding.New in version 0.6: 选项
pyobject,lines,start-after及end-before, 并支持绝对文件名.New in version 1.0: 选项
prepend、append及tab-width.
Footnotes
| [1] | 标准包含指令 .. include , 如果文件不存在会抛出异常. 这一个则仅会产生警告. |
内联标记
Sphinx 使用文本解释角色在文档中插入语义标签.
这样写 :rolename:`content`.
Note
默认角色 (`content`) 并不特别. 可使用任何其他有效的名字来代替; 使用 :confval:`default_role` 设置.
由主域添加的角色请参考 Sphinx Domains .
交叉索引的语法
多数文本解释角色都会产生交叉索引.
需要写一个 :role:`target`, 创建名为 target 的链接,类型由 role 指定. 链接文本与 target 一样.
还有其他的功能,这使得交叉索引更通用:
需要明确的标题及索引标签, 像reST 超链接:
:role:`title <target>`,会链接 target 标签, 但链接文本为 title.加前缀
!, 交叉索引/超链接不会被创建.前缀
~, 链接文本仅是标签的最后成分. 例如,:py:meth:`~Queue.Queue.get`会建立到Queue.Queue.get的链接,但是链接文本仅显示get.HTML 文档, 链接的
title属性 (显示为鼠标的tool-tip) 一直是完整的标签名.
交叉索引的位置
-
:ref: 在文档的任意位置都可以使用交叉索引, 像标准reST 标签一样使用. 对于文档条目这些标签名必须是唯一的.有两种方式可以链接到这些标签:
标签直接放在章节标题前面, 可以通过
:ref:`label-name`引用.例如:.. _my-reference-label: Section to cross-reference -------------------------- 章节内容. 需引用自身, 查看 :ref:`my-reference-label`.
角色
:ref:会产生这个章节的链接, 链接标题是 “Section to cross-reference”. 章节与索引可在不同的源文件.自动标签也可以使用 figures: given
.. _my-figure:

.. figure:: whatever

   Figure caption
参考
:ref:`my-figure`将在图例里插入引用索引,链接文本是 “Figure caption”.表格也可以使用,在表格标题上使用指令 :dudir:`table` .
标签不放在章节开头,需要给出明确的链接,使用语法:
:ref:`Link title <label-name>`.
推荐使用角色
ref而不是标准的reStructuredText 章节链接 (比如`Section title`_) ,因为它可以在不同文件间使用,并且即使章节标题变化,所有的生成器仍支持这些索引.
参考文档
New in version 0.6.
可以直接链接到文档名.
-
:doc: 链接到指定文档; 文档名可以是绝对或相对的. 例如, 参考
:doc:`parrot`出现在文档sketches/index``中, 将会链接到文档 ``sketches/parrot. 如果参考是:doc:`/people`或:doc:`../people`, 将会链接到文档people.如果没有给出链接标题(使用:
:doc:`Monty Python members
</people>`
), 链接标题就是文档的标题.
可下载的参考文件
New in version 0.6.
-
:download: 该角色可以链接源目录里可以浏览、但不是reST格式的文档,这些文件将被下载.
如果使用该角色,被参考的文件会自动包含到输出里(显然仅是HTML输出). 可下载文件被放在输出目录的子目录
_downloads里;文件名被复制.示例:
查看 :download:`this example script <../example.py>`.
文件名是当前路径的相对路径, 绝对路径则被认为以源目录为根目录的相对路径.
文件
example.py被复制到输出目录, 并生成链接.
其他有趣的交叉索引
以下角色也会生成索引, 但不对应实体:
-
:envvar: 环境变量. 会生成索引. 也会产生到指令
envvar的链接,如果指令存在.
-
:token: 语法名子 (用来产生到指令
productionlist的链接).
-
:keyword: Python的关键字. 会创建这些关键字的链接.
-
:option: 执行程序的命令行参数. 需包含连字号开头. 产生到指令
option的链接.
以下角色产生术语的索引:
-
:term: 术语索引. 术语由指令
glossary创建,包含一列术语的定义. 在同一文件里不能使用term标记, Python 文档有一个全局的术语文件glossary.rst.如果使用的术语不在术语表里, 将会产生警告.
其他语义标记
下面的这些角色以不同样式格式化文本:
-
:abbr: 缩写应用. 如果角色后有个括号说明文字,在HTML时会显示成 tool-tip ,仅在LaTeX才会输出.
例如:
:abbr:`LIFO (last-in, first-out)`.New in version 0.6.
-
:command: 系统级别的命令,例如
rm.
-
:dfn: 在文本中标记术语定义. (不产生索引条目)
-
:file: 文件或目录名. 可以使用花括号指示变量部分, 例如:
... is installed in :file:`/usr/lib/python2.{x}/site-packages` ...在生成文档时,
x会被Python 的次要版本号替换.
-
:guilabel: 表示用户交互接口的标签需使用
guilabel标记. 包含基于文本的接口如 使用curses创建的或基于其他文本库的标签. 接口标签必须使用该角色标记, 包括按钮,窗口标题,文件名,菜单,菜单选项,甚至选择列表里的值.Changed in version 1.0: GUI 标签可以使用&标示快捷方式; 输出时&不会显示,而是在文本下面加下划线 (例如:
:guilabel:`&Cancel`). 要在输出是包含&,则使用两个&&.
-
:kbd: 标记键值序列. 键值序列一般依赖于平台或特定应用程序的约定. 如果没有相关的约定, 键值序列的名字应该可以修改, 以改善新用户或非英语系使用者的体验. 例如, 一个 xemacs 键序被标记为
:kbd:`C-x C-f`, 如果没有特定应用程序或平台可供参考, 则同样的键序应该被标记为:kbd:`Control-x Control-f`.
-
:mailheader: RFC 822-样式邮件头的名字. 该标记并不表明邮件头在邮件信息里使用, 而是被用来映射所有相同样式的邮件头. 也被用来定义有邮件头的MIME类型. 在实践中邮件头名通常以相同的方式键入, 遵循 camel-casing 约定, 有多种通用用法时被优选采用. 例如:
:mailheader:`Content-Type`.
-
:makevar: 命令 make 的变量名.
-
:manpage: 参考 Unix 手册页,包含章节,例如
:manpage:`ls(1)`.
菜单选项由角色
menuselection标记. 标记完整的菜单选项序列,包含子菜单和选择的特定操作,以及所有的子序列. 独立选项的名字使用-->分隔.例如,标记选项 “Start > Programs”:
:menuselection:`Start --> Programs`
选项如果包含一些指示, 例如某些操作系统会使用一些标志指示命令会打开一个对话框, 这些指示信息在选项名中会被忽略.
menuselection也支持&, 与guilabel一样使用.
-
:mimetype: MIME 类型, 或者MIME 类型的元素 (主要次要部分可以分开).
-
:newsgroup: Usenet 新闻组.
-
:program: 执行程序脚本. 与某些平台的可执行文件名不同, 比如Windows 程序的
.exe(或其他) 扩展名会被忽略.
-
:regexp: 正则表达式,不包括引用.
-
:samp: 一块字面量文本,如代码. 文本内可以有花括号变量,如在
file一样. 例如, 在:samp:`print 1+{variable}`,variable的部分会被强调.如不需要变量部分,使用标准代码即可.
角色 index 会产生索引条目.
下面的角色会产生外部链接:
-
:pep: 对Python Enhancement Proposal 的参考. 会产生适当的索引条目及文本 “PEP number” ; 在HTML 文档,该文本是指向在线PEP文档的超链接. 可以链接到特定章节
:pep:`number#anchor`.
-
:rfc: Internet Request for Comments的参考. 也会产生索引条目及文本 “RFC number” ; 在HTML文档里是一个超链接,指定链接章节
:rfc:`number#anchor`.
如果没有特定的角色能够包含需要的超链接,就使用标准reST 标记.
替换
文档系统提供三种默认定义的替换,可在配置文件里设置.
-
|release| 被项目文档的发布版本替换. 这时版本字符串包含完整的标签 alpha/beta/release ,例如
2.5.2b3. 由 :confval:`release` 设置.
-
|version| 被项目文档的版本替换. 版本字符串仅有主要和次要两部分组成,例如版本2.5.1会表示为
2.5. 由 :confval:`version` 设置.
-
|today| 替换今天的日期 (文档被读取的日期), 或者配置文件设置的日期. 默认格式为
April 14, 2007. 可设置 :confval:`today_fmt` 及 :confval:`today` .
未分类标记
文件范围的元数据
reST 有字段列表”field lists” 的概念; 字段序列如下:
:fieldname: Field content
文件开端的字段列表会被文档工具解释为文档源信息,通常记录了作者,出版日期等元数据. 在Sphinx中, 在所有标记前面的字段列表将作为文档元数据放在Sphinx 环境中,不显示在输出文档中; 在文档标题后的字段列表仍然是文档源信息的一部分显示在输出文档中.
此时, 这些元数据字段会被识别:
tocdepth文件目录表的最大深度.
New in version 0.4.
nocomments- 如果设置了, 网页不会显示源文件生成的评论.
orphan如果设置, 不在目录结构中的文件产生的警告会被忽略.
New in version 1.0.
元信息标记
当前章节作者标示. 参数是作者名字,可以展示或放在邮件地址中. 地址的主域名通常要小写. 例如:
.. sectionauthor:: Guido van Rossum <[email protected]>
默认这些标记不会出现在输出文档中 (对追述贡献有帮助), 可以设置 :confval:`show_authors` 的值为真,使其产生一段输出.
指令
codeauthor, 可多次出现,记录代码的作者, 就像sectionauthor记录文档章节的作者一样. 在 :confval:`show_authors` 为真时才显示在输出中.
索引生成标记
Sphinx 自动从对象(函数、类及属性)说明中生成索引条目;在 Sphinx Domains 也有讨论.
这是个明确的标记,使得生成的索引更全面, 索引条目将会包含信息单元的次要信息,如语言参考.
-
.. index::<entries> 指令包含一到多条索引条目. 每个条目有类型和值组成,以冒号分隔.
例如:
.. index::
   single: execution; context
   module: __main__
   module: sys
   triple: module; search; path

The execution context
---------------------

...
这个指令包含5个条目, 产生的索引会链接到页面确切的位置(离线时是相关的页码).
索引指令会在源位置插入参考标签, 并会放在它们实际所映射内容的前面,上面例子中实际映射内容是标题.
条目类型:
- single
- 创建单一索引条目. 可以使用分号分隔子条目(该符号也用来描述创建了那些条目).
- pair
pair: loop; statement创建两个索引条目的简写, 命名为loop; statement或statement; loop.- triple
- 例如
triple: module; search; path创建三个条目的简写, 它们是module; search path,search; path, module及path; module search. - see
see: entry; other创建可以映射到其他条目的索引.- seealso
- 如
see, 但是插入 “see also” 代替 “see”. - 模块, 关键字, 操作符, 对象, 异常, 声明, 内建指令均会创建两个索引条目.
- 例如,
module: hashlib``会创建条目 ``module; hashlib和hashlib; module. (这是Python特定的,因此不推荐使用)
可以加前缀感叹号表示主要的索引条目. 主要索引会被强调显示. 例如, 有两个文件包含
.. index:: Python
一个文件包含
.. index:: ! Python
在反向链接中后面那个的索引会被强调.
索引指令仅包含单一条目,这是简短的用法:
.. index:: BNF, grammar, syntax, notation
创建了4个条目.
Changed in version 1.1: 添加了
seeandseealso类型, 及主条目标记.
-
:index: 当指令
index在模块级别并链接到下一段的开头, 仍有相应的角色在使用的地方设置链接标签.角色的内容可以是一个短语,保留在文本中并作为索引条目使用. 也可以是文本与索引条目的组合,看起来是明确的参考文献标记. 这时, 标记部分如指令条目的描述一样. 例如:
一般的 reST :index:`paragraph` 包含几条
:index:`index entries <pair: index; entry>`.
New in version 1.1.
包含基于标签的内容
-
.. only::<expression> 当 expression 为真时包含指令的内容. 表达式由标签组成, 如下:
.. only:: html and draft
未定义的标签为假, 定义的为真 (使用
-t命令行参数或者在文件conf.py中定义) . 布尔表达式, 可使用括号 (如html and (latex or draft)) .当前生成器的格式(
html,latexortext)会被设置为标签.New in version 0.6.
Tables
使用 standard reStructuredText tables. 在HTML中工作良好, 但是输出LaTeX文档时经常会有些问题: 列的宽度经常不能自动正确的显示. 因此, 出现如下指令:
-
.. tabularcolumns::column spec 指令给出了下面文件中表格的列规格. 这个规格是LaTeX 的
tabulary封装环境的第二个参数(tabulary用来翻译表格). 如下|l|l|l|
这表示左调整,无分行的列. 如果列包含长文本将会自动被截断, 使用标准构建
p{width}, 或由 tabulary自动定义:L左调整,自动宽度 R右调整,自动宽度 C居中,自动宽度 J自调整,自动宽度 根据表格里的内容自动调节宽度, 测量标准为它们占据的总宽度.
默认, Sphinx 使用的列布局是
L.New in version 0.3.
Warning
表格包含列表类元素比如对象描述,模块引用等,这些列表不能在 tabulary 以外设置.
因此需要设置标准 LaTeX tabular 环境,或者给出 tabularcolumns 指令.
然后 tabulary 设置表格, 且必须使用 p{width} 构建包含这些元素的列.
字面模块不能使用 tabulary , 包含字面模块的表格需使用 tabular.
当然字面模块使用的字体环境仅支持 p{width} 列, 这也是默认的方式, Sphinx会生成这些表格的列规格.
使用 tabularcolumns 指令可以更好的控制表格.
更多标记请参考 Sphinx Domains.
Sphinx Domains
New in version 1.0.
What is a Domain?
Originally, Sphinx was conceived for a single project, the documentation of the
Python language. Shortly afterwards, it was made available for everyone as a
documentation tool, but the documentation of Python modules remained deeply
built in – the most fundamental directives, like function, were designed
for Python objects. Since Sphinx has become somewhat popular, interest
developed in using it for many different purposes: C/C++ projects, JavaScript,
or even reStructuredText markup (like in this documentation).
While this was always possible, it is now much easier to easily support documentation of projects using different programming languages or even ones not supported by the main Sphinx distribution, by providing a domain for every such purpose.
A domain is a collection of markup (reStructuredText directives and
roles) to describe and link to objects belonging together,
e.g. elements of a programming language. Directive and role names in a domain
have names like domain:name, e.g. py:function. Domains can also provide
custom indices (like the Python Module Index).
Having domains means that there are no naming problems when one set of documentation wants to refer to e.g. C++ and Python classes. It also means that extensions that support the documentation of whole new languages are much easier to write.
This section describes what the domains that come with Sphinx provide. The domain API is documented as well, in the section Domain API.
Basic Markup
Most domains provide a number of object description directives, used to
describe specific objects provided by modules. Each directive requires one or
more signatures to provide basic information about what is being described, and
the content should be the description. The basic version makes entries in the
general index; if no index entry is desired, you can give the directive option
flag :noindex:. An example using a Python domain directive:
.. py:function:: spam(eggs)
                 ham(eggs)

   Spam or ham the foo.
This describes the two Python functions spam and ham. (Note that when
signatures become too long, you can break them if you add a backslash to lines
that are continued in the next line. Example:
.. py:function:: filterwarnings(action, message='', category=Warning, \
                                module='', lineno=0, append=False)
   :noindex:
(This example also shows how to use the :noindex: flag.)
The domains also provide roles that link back to these object descriptions. For example, to link to one of the functions described in the example above, you could say
The function :py:func:`spam` does a similar thing.
As you can see, both directive and role names contain the domain name and the directive name.
Default Domain
To avoid having to writing the domain name all the time when you e.g. only describe Python objects, a default domain can be selected with either the config value :confval:`primary_domain` or this directive:
-
.. default-domain::name Select a new default domain. While the :confval:`primary_domain` selects a global default, this only has an effect within the same file.
If no other default is selected, the Python domain (named py) is the default
one, mostly for compatibility with documentation written for older versions of
Sphinx.
Directives and roles that belong to the default domain can be mentioned without giving the domain name, i.e.
.. function:: pyfunc()

   Describes a Python function.

Reference to :func:`pyfunc`.
Cross-referencing syntax
For cross-reference roles provided by domains, the same facilities exist as for general cross-references. See 交叉索引的语法.
In short:
- You may supply an explicit title and reference target:
:role:`title
<target>`
will refer to target, but the link text will be title. - If you prefix the content with
!, no reference/hyperlink will be created. - If you prefix the content with
~, the link text will only be the last component of the target. For example,:py:meth:`~Queue.Queue.get`will refer toQueue.Queue.getbut only displaygetas the link text.
The Python Domain
The Python domain (name py) provides the following directives for module declarations:
-
.. py:module::name This directive marks the beginning of the description of a module (or package submodule, in which case the name should be fully qualified, including the package name). It does not create content (like e.g.
py:classdoes).This directive will also cause an entry in the global module index.
The
platformoption, if present, is a comma-separated list of the platforms on which the module is available (if it is available on all platforms, the option should be omitted). The keys are short identifiers; examples that are in use include “IRIX”, “Mac”, “Windows”, and “Unix”. It is important to use a key which has already been used when applicable.The
synopsisoption should consist of one sentence describing the module’s purpose – it is currently only used in the Global Module Index.The
deprecatedoption can be given (with no value) to mark a module as deprecated; it will be designated as such in various locations then.
-
.. py:currentmodule::name This directive tells Sphinx that the classes, functions etc. documented from here are in the given module (like
py:module), but it will not create index entries, an entry in the Global Module Index, or a link target forpy:mod. This is helpful in situations where documentation for things in a module is spread over multiple files or sections – one location has thepy:moduledirective, the others onlypy:currentmodule.
The following directives are provided for module and class contents:
-
.. py:data::name Describes global data in a module, including both variables and values used as “defined constants.” Class and object attributes are not documented using this environment.
-
.. py:exception::name Describes an exception class. The signature can, but need not include parentheses with constructor arguments.
-
.. py:function::name(signature) Describes a module-level function. The signature should include the parameters, enclosing optional parameters in brackets. Default values can be given if it enhances clarity; see Python Signatures. For example:
.. py:function:: Timer.repeat([repeat=3[, number=1000000]])
Object methods are not documented using this directive. Bound object methods placed in the module namespace as part of the public interface of the module are documented using this, as they are equivalent to normal functions for most purposes.
The description should include information about the parameters required and how they are used (especially whether mutable objects passed as parameters are modified), side effects, and possible exceptions. A small example may be provided.
-
.. py:class::name[(signature)] Describes a class. The signature can include parentheses with parameters which will be shown as the constructor arguments. See also Python Signatures.
Methods and attributes belonging to the class should be placed in this directive’s body. If they are placed outside, the supplied name should contain the class name so that cross-references still work. Example:
.. py:class:: Foo
   .. py:method:: quux()

-- or --

.. py:class:: Bar

.. py:method:: Bar.quux()
The first way is the preferred one.
-
.. py:attribute::name Describes an object data attribute. The description should include information about the type of the data to be expected and whether it may be changed directly.
-
.. py:method::name(signature) Describes an object method. The parameters should not include the
selfparameter. The description should include similar information to that described forfunction. See also Python Signatures.
-
.. py:staticmethod::name(signature) Like
py:method, but indicates that the method is a static method.New in version 0.4.
-
.. py:classmethod::name(signature) Like
py:method, but indicates that the method is a class method.New in version 0.6.
-
.. py:decorator::name -
.. py:decorator::name(signature) Describes a decorator function. The signature should not represent the signature of the actual function, but the usage as a decorator. For example, given the functions
def removename(func):
    func.__name__ = ''
    return func

def setnewname(name):
    def decorator(func):
        func.__name__ = name
        return func
    return decorator
the descriptions should look like this:
.. py:decorator:: removename

   Remove name of the decorated function.

.. py:decorator:: setnewname(name)

   Set name of the decorated function to *name*.
There is no
py:decorole to link to a decorator that is marked up with this directive; rather, use thepy:funcrole.
-
.. py:decoratormethod::name -
.. py:decoratormethod::name(signature) Same as
py:decorator, but for decorators that are methods.Refer to a decorator method using the
py:methrole.
Python Signatures
Signatures of functions, methods and class constructors can be given like they would be written in Python, with the exception that optional parameters can be indicated by brackets:
.. py:function:: compile(source[, filename[, symbol]])
It is customary to put the opening bracket before the comma. In addition to this “nested” bracket style, a “flat” style can also be used, due to the fact that most optional parameters can be given independently:
.. py:function:: compile(source[, filename, symbol])
Default values for optional arguments can be given (but if they contain commas, they will confuse the signature parser). Python 3-style argument annotations can also be given as well as return type annotations:
.. py:function:: compile(source : string[, filename, symbol]) -> ast object
Info field lists
New in version 0.4.
Inside Python object description directives, reST field lists with these fields are recognized and formatted nicely:
param,parameter,arg,argument,key,keyword: Description of a parameter.type: Type of a parameter.raises,raise,except,exception: That (and when) a specific exception is raised.var,ivar,cvar: Description of a variable.returns,return: Description of the return value.rtype: Return type.
The field names must consist of one of these keywords and an argument (except
for returns and rtype, which do not need an argument). This is best
explained by an example:
.. py:function:: format_exception(etype, value, tb[, limit=None])

   Format the exception with a traceback.

   :param etype: exception type
   :param value: exception value
   :param tb: traceback object
   :param limit: maximum number of stack frames to show
   :type limit: integer or None
   :rtype: list of strings
This will render like this:
format_exception(etype, value, tb[, limit=None])Format the exception with a traceback.
Parameters:
- etype – exception type
- value – exception value
- tb – traceback object
- limit (integer or None) – maximum number of stack frames to show
Return type: list of strings
It is also possible to combine parameter type and description, if the type is a single word, like this:
:param integer limit: maximum number of stack frames to show
Cross-referencing Python objects
The following roles refer to objects in modules and are possibly hyperlinked if a matching identifier is found:
-
:py:mod: Reference a module; a dotted name may be used. This should also be used for package names.
-
:py:func: Reference a Python function; dotted names may be used. The role text needs not include trailing parentheses to enhance readability; they will be added automatically by Sphinx if the :confval:`add_function_parentheses` config value is true (the default).
-
:py:data: Reference a module-level variable.
-
:py:const: Reference a “defined” constant. This may be a C-language
#defineor a Python variable that is not intended to be changed.
-
:py:class: Reference a class; a dotted name may be used.
-
:py:meth: Reference a method of an object. The role text can include the type name and the method name; if it occurs within the description of a type, the type name can be omitted. A dotted name may be used.
-
:py:attr: Reference a data attribute of an object.
-
:py:exc: Reference an exception. A dotted name may be used.
-
:py:obj: Reference an object of unspecified type. Useful e.g. as the :confval:`default_role`.
New in version 0.4.
The name enclosed in this markup can include a module name and/or a class name.
For example, :py:func:`filter` could refer to a function named filter in
the current module, or the built-in function of that name. In contrast,
:py:func:`foo.filter` clearly refers to the filter function in the
foo module.
Normally, names in these roles are searched first without any further
qualification, then with the current module name prepended, then with the
current module and class name (if any) prepended. If you prefix the name with a
dot, this order is reversed. For example, in the documentation of Python’s
codecs module, :py:func:`open` always refers to the built-in
function, while :py:func:`.open` refers to codecs.open().
A similar heuristic is used to determine whether the name is an attribute of the currently documented class.
Also, if the name is prefixed with a dot, and no exact match is found, the
target is taken as a suffix and all object names with that suffix are
searched. For example, :py:meth:`.TarFile.close` references the
tarfile.TarFile.close() function, even if the current module is not
tarfile. Since this can get ambiguous, if there is more than one possible
match, you will get a warning from Sphinx.
Note that you can combine the ~ and . prefixes:
:py:meth:`~.TarFile.close` will reference the tarfile.TarFile.close()
method, but the visible link caption will only be close().
The C Domain
The C domain (name c) is suited for documentation of C API.
-
.. c:function::type name(signature) Describes a C function. The signature should be given as in C, e.g.:
.. c:function:: PyObject* PyType_GenericAlloc(PyTypeObject *type, Py_ssize_t nitems)
This is also used to describe function-like preprocessor macros. The names of the arguments should be given so they may be used in the description.
Note that you don’t have to backslash-escape asterisks in the signature, as it is not parsed by the reST inliner.
-
.. c:member::type name Describes a C struct member. Example signature:
.. c:member:: PyObject* PyTypeObject.tp_bases
The text of the description should include the range of values allowed, how the value should be interpreted, and whether the value can be changed. References to structure members in text should use the
memberrole.
-
.. c:macro::name Describes a “simple” C macro. Simple macros are macros which are used for code expansion, but which do not take arguments so cannot be described as functions. This is not to be used for simple constant definitions. Examples of its use in the Python documentation include
PyObject_HEADandPy_BEGIN_ALLOW_THREADS.
-
.. c:type::name Describes a C type (whether defined by a typedef or struct). The signature should just be the type name.
-
.. c:var::type name Describes a global C variable. The signature should include the type, such as:
.. c:var:: PyObject* PyClass_Type
Cross-referencing C constructs
The following roles create cross-references to C-language constructs if they are defined in the documentation:
-
:c:data: Reference a C-language variable.
-
:c:func: Reference a C-language function. Should include trailing parentheses.
-
:c:macro: Reference a “simple” C macro, as defined above.
-
:c:type: Reference a C-language type.
The C++ Domain
The C++ domain (name cpp) supports documenting C++ projects.
The following directives are available:
-
.. cpp:class::signatures -
.. cpp:function::signatures -
.. cpp:member::signatures -
.. cpp:type::signatures Describe a C++ object. Full signature specification is supported – give the signature as you would in the declaration. Here some examples:
.. cpp:function:: bool namespaced::theclass::method(int arg1, std::string arg2)

   Describes a method with parameters and types.

.. cpp:function:: bool namespaced::theclass::method(arg1, arg2)

   Describes a method without types.

.. cpp:function:: const T &array<T>::operator[]() const

   Describes the constant indexing operator of a templated array.

.. cpp:function:: operator bool() const

   Describe a casting operator here.

.. cpp:function:: constexpr void foo(std::string &bar[2]) noexcept

   Describe a constexpr function here.

.. cpp:member:: std::string theclass::name

.. cpp:member:: std::string theclass::name[N][M]

.. cpp:type:: theclass::const_iterator
Will be rendered like this:
-
bool
namespaced::theclass::method(int arg1, std::string arg2) Describes a method with parameters and types.
-
bool
namespaced::theclass::method(arg1, arg2) Describes a method without types.
-
template<>
const T &array<T>::operator[]() const Describes the constant indexing operator of a templated array.
-
operator bool() const Describe a casting operator here.
-
constexpr void
foo(std::string &bar[2]) noexcept Describe a constexpr function here.
-
std::string
theclass::name
-
std::string
theclass::name[N][M]
-
type
theclass::const_iterator
-
bool
-
.. cpp:namespace::namespace Select the current C++ namespace for the following objects.
These roles link to the given object types:
-
:cpp:class: -
:cpp:func: -
:cpp:member: -
:cpp:type: Reference a C++ object. You can give the full signature (and need to, for overloaded functions.)
Note
Sphinx’ syntax to give references a custom title can interfere with linking to template classes, if nothing follows the closing angle bracket, i.e. if the link looks like this:
:cpp:class:`MyClass<T>`. This is interpreted as a link toTwith a title ofMyClass. In this case, please escape the opening angle bracket with a backslash, like this::cpp:class:`MyClass\<T>`.
Note on References
It is currently impossible to link to a specific version of an overloaded method. Currently the C++ domain is the first domain that has basic support for overloaded methods and until there is more data for comparison we don’t want to select a bad syntax to reference a specific overload. Currently Sphinx will link to the first overloaded version of the method / function.
The Standard Domain
The so-called “standard” domain collects all markup that doesn’t warrant a domain of its own. Its directives and roles are not prefixed with a domain name.
The standard domain is also where custom object descriptions, added using the
add_object_type() API, are placed.
There is a set of directives allowing documenting command-line programs:
-
.. option::name args, name args, ... Describes a command line option or switch. Option argument names should be enclosed in angle brackets. Example:
.. option:: -m <module>, --module <module>

   Run a module as a script.
The directive will create a cross-reference target named after the first option, referencable by
option(in the example case, you’d use something like:option:`-m`).
-
.. envvar::name Describes an environment variable that the documented code or program uses or defines. Referencable by
envvar.
-
.. program::name Like
py:currentmodule, this directive produces no output. Instead, it serves to notify Sphinx that all followingoptiondirectives document options for the program called name.If you use
program, you have to qualify the references in youroptionroles by the program name, so if you have the following situation.. program:: rm .. option:: -r Work recursively. .. program:: svn .. option:: -r revision Specify the revision to work upon.
then
:option:`rm -r`would refer to the first option, while:option:`svn -r`would refer to the second one.The program name may contain spaces (in case you want to document subcommands like
svn addandsvn commitseparately).New in version 0.5.
There is also a very generic object description directive, which is not tied to any domain:
-
.. describe::text -
.. object::text This directive produces the same formatting as the specific ones provided by domains, but does not create index entries or cross-referencing targets. Example:
.. describe:: PAPER

   You can set this variable to select a paper size.
The JavaScript Domain
The JavaScript domain (name js) provides the following directives:
-
.. js:function::name(signature) Describes a JavaScript function or method. If you want to describe arguments as optional use square brackets as documented for Python signatures.
You can use fields to give more details about arguments and their expected types, errors which may be thrown by the function, and the value being returned:
.. js:function:: $.getJSON(href, callback[, errback])

   :param string href: An URI to the location of the resource.
   :param callback: Get's called with the object.
   :param errback:
       Get's called in case the request fails. And a lot of other
       text so we need multiple lines
   :throws SomeError: For whatever reason in that case.
   :returns: Something
This is rendered as:
-
$.getJSON(href, callback[, errback]) Arguments: - href (string) – An URI to the location of the resource.
- callback – Get’s called with the object.
- errback – Get’s called in case the request fails. And a lot of other text so we need multiple lines.
Throws: SomeError – For whatever reason in that case.
Returns: Something
-
-
.. js:class::name Describes a constructor that creates an object. This is basically like a function but will show up with a class prefix:
.. js:class:: MyAnimal(name[, age])

   :param string name: The name of the animal
   :param number age: an optional age for the animal
This is rendered as:
-
class
MyAnimal(name[, age]) Arguments: - name (string) – The name of the animal
- age (number) – an optional age for the animal
-
class
-
.. js:data::name Describes a global variable or constant.
-
.. js:attribute::object.name Describes the attribute name of object.
These roles are provided to refer to the described objects:
-
:js:func: -
:js:class: -
:js:data: -
:js:attr:
The reStructuredText domain
The reStructuredText domain (name rst) provides the following directives:
-
.. rst:directive::name Describes a reST directive. The name can be a single directive name or actual directive syntax (.. prefix and :: suffix) with arguments that will be rendered differently. For example:
.. rst:directive:: foo

   Foo description.

.. rst:directive:: .. bar:: baz

   Bar description.
will be rendered as:
-
.. foo:: Foo description.
-
.. bar::baz Bar description.
-
-
.. rst:role::name Describes a reST role. For example:
.. rst:role:: foo

   Foo description.
will be rendered as:
-
:foo: Foo description.
-
These roles are provided to refer to the described objects:
-
:rst:dir: -
:rst:role:
More domains
The sphinx-contrib repository contains more domains available as extensions; currently a Ruby and an Erlang domain.
Available builders
These are the built-in Sphinx builders. More builders can be added by extensions.
The builder’s “name” must be given to the -b command-line option of sphinx-build to select a builder.
-
class
sphinx.builders.html.StandaloneHTMLBuilder This is the standard HTML builder. Its output is a directory with HTML files, complete with style sheets and optionally the reST sources. There are quite a few configuration values that customize the output of this builder, see the chapter Options for HTML output for details.
Its name is
html.
-
class
sphinx.builders.html.DirectoryHTMLBuilder This is a subclass of the standard HTML builder. Its output is a directory with HTML files, where each file is called
index.htmland placed in a subdirectory named like its page name. For example, the documentmarkup/rest.rstwill not result in an output filemarkup/rest.html, butmarkup/rest/index.html. When generating links between pages, theindex.htmlis omitted, so that the URL would look likemarkup/rest/.Its name is
dirhtml.New in version 0.6.
-
class
sphinx.builders.html.SingleFileHTMLBuilder This is an HTML builder that combines the whole project in one output file. (Obviously this only works with smaller projects.) The file is named like the master document. No indices will be generated.
Its name is
singlehtml.New in version 1.0.
-
class
sphinx.builders.htmlhelp.HTMLHelpBuilder This builder produces the same output as the standalone HTML builder, but also generates HTML Help support files that allow the Microsoft HTML Help Workshop to compile them into a CHM file.
Its name is
htmlhelp.
-
class
sphinx.builders.qthelp.QtHelpBuilder This builder produces the same output as the standalone HTML builder, but also generates Qt help collection support files that allow the Qt collection generator to compile them.
Its name is
qthelp.
-
class
sphinx.builders.devhelp.DevhelpBuilder This builder produces the same output as the standalone HTML builder, but also generates GNOME Devhelp support file that allows the GNOME Devhelp reader to view them.
Its name is
devhelp.
-
class
sphinx.builders.epub.EpubBuilder This builder produces the same output as the standalone HTML builder, but also generates an epub file for ebook readers. See Epub info for details about it. For definition of the epub format, have a look at http://www.idpf.org/specs.htm or http://en.wikipedia.org/wiki/EPUB.
Some ebook readers do not show the link targets of references. Therefore this builder adds the targets after the link when necessary. The display of the URLs can be customized by adding CSS rules for the class
link-target.Its name is
epub.
-
class
sphinx.builders.latex.LaTeXBuilder This builder produces a bunch of LaTeX files in the output directory. You have to specify which documents are to be included in which LaTeX files via the :confval:`latex_documents` configuration value. There are a few configuration values that customize the output of this builder, see the chapter Options for LaTeX output for details.
Note
The produced LaTeX file uses several LaTeX packages that may not be present in a “minimal” TeX distribution installation. For TeXLive, the following packages need to be installed:
- latex-recommended
- latex-extra
- fonts-recommended
Its name is
latex.
Note that a direct PDF builder using ReportLab is available in rst2pdf version 0.12 or greater. You need to add
'rst2pdf.pdfbuilder' to your :confval:`extensions` to enable it, its name is
pdf. Refer to the rst2pdf manual for details.
-
class
sphinx.builders.text.TextBuilder This builder produces a text file for each reST file – this is almost the same as the reST source, but with much of the markup stripped for better readability.
Its name is
text.New in version 0.4.
-
class
sphinx.builders.manpage.ManualPageBuilder This builder produces manual pages in the groff format. You have to specify which documents are to be included in which manual pages via the :confval:`man_pages` configuration value.
Its name is
man.Note
This builder requires the docutils manual page writer, which is only available as of docutils 0.6.
New in version 1.0.
-
class
sphinx.builders.texinfo.TexinfoBuilder This builder produces Texinfo files that can be processed into Info files by the makeinfo program. You have to specify which documents are to be included in which Texinfo files via the :confval:`texinfo_documents` configuration value.
The Info format is the basis of the on-line help system used by GNU Emacs and the terminal-based program info. See Texinfo info for more details. The Texinfo format is the official documentation system used by the GNU project. More information on Texinfo can be found at http://www.gnu.org/software/texinfo/.
Its name is
texinfo.New in version 1.1.
-
class
sphinx.builders.html.SerializingHTMLBuilder This builder uses a module that implements the Python serialization API (pickle, simplejson, phpserialize, and others) to dump the generated HTML documentation. The pickle builder is a subclass of it.
A concrete subclass of this builder serializing to the PHP serialization format could look like this:
import phpserialize class PHPSerializedBuilder(SerializingHTMLBuilder): name = 'phpserialized' implementation = phpserialize out_suffix = '.file.phpdump' globalcontext_filename = 'globalcontext.phpdump' searchindex_filename = 'searchindex.phpdump'-
implementation A module that implements dump(), load(), dumps() and loads() functions that conform to the functions with the same names from the pickle module. Known modules implementing this interface are simplejson (or json in Python 2.6), phpserialize, plistlib, and others.
-
out_suffix The suffix for all regular files.
-
globalcontext_filename The filename for the file that contains the “global context”. This is a dict with some general configuration values such as the name of the project.
-
searchindex_filename The filename for the search index Sphinx generates.
See Serialization builder details for details about the output format.
New in version 0.5.
-
-
class
sphinx.builders.html.PickleHTMLBuilder This builder produces a directory with pickle files containing mostly HTML fragments and TOC information, for use of a web application (or custom postprocessing tool) that doesn’t use the standard HTML templates.
See Serialization builder details for details about the output format.
Its name is
pickle. (The old namewebstill works as well.)The file suffix is
.fpickle. The global context is calledglobalcontext.pickle, the search indexsearchindex.pickle.
-
class
sphinx.builders.html.JSONHTMLBuilder This builder produces a directory with JSON files containing mostly HTML fragments and TOC information, for use of a web application (or custom postprocessing tool) that doesn’t use the standard HTML templates.
See Serialization builder details for details about the output format.
Its name is
json.The file suffix is
.fjson. The global context is calledglobalcontext.json, the search indexsearchindex.json.New in version 0.5.
-
class
sphinx.builders.gettext.MessageCatalogBuilder This builder produces gettext-style message catalogs. Each top-level file or subdirectory grows a single
.potcatalog template.See the documentation on Internationalization for further reference.
Its name is
gettext.New in version 1.1.
-
class
sphinx.builders.changes.ChangesBuilder This builder produces an HTML overview of all
versionadded,versionchangedanddeprecateddirectives for the current :confval:`version`. This is useful to generate a ChangeLog file, for example.Its name is
changes.
-
class
sphinx.builders.linkcheck.CheckExternalLinksBuilder This builder scans all documents for external links, tries to open them with
urllib2, and writes an overview which ones are broken and redirected to standard output and tooutput.txtin the output directory.Its name is
linkcheck.
Built-in Sphinx extensions that offer more builders are:
Serialization builder details
All serialization builders outputs one file per source file and a few special
files. They also copy the reST source files in the directory _sources
under the output directory.
The PickleHTMLBuilder is a builtin subclass that implements the pickle
serialization interface.
The files per source file have the extensions of
out_suffix, and are arranged in directories
just as the source files are. They unserialize to a dictionary (or dictionary
like structure) with these keys:
body- The HTML “body” (that is, the HTML rendering of the source file), as rendered by the HTML translator.
title- The title of the document, as HTML (may contain markup).
toc- The table of contents for the file, rendered as an HTML
<ul>. display_toc- A boolean that is
Trueif thetoccontains more than one entry. current_page_name- The document name of the current file.
parents,prevandnext- Information about related chapters in the TOC tree. Each relation is a
dictionary with the keys
link(HREF for the relation) andtitle(title of the related document, as HTML).parentsis a list of relations, whileprevandnextare a single relation. sourcename- The name of the source file under
_sources.
The special files are located in the root output directory. They are:
SerializingHTMLBuilder.globalcontext_filenameA pickled dict with these keys:
project,copyright,release,version- The same values as given in the configuration file.
style- :confval:`html_style`.
last_updated- Date of last build.
builder- Name of the used builder, in the case of pickles this is always
'pickle'. titles- A dictionary of all documents’ titles, as HTML strings.
SerializingHTMLBuilder.searchindex_filenameAn index that can be used for searching the documentation. It is a pickled list with these entries:
- A list of indexed docnames.
- A list of document titles, as HTML strings, in the same order as the first list.
- A dict mapping word roots (processed by an English-language stemmer) to a list of integers, which are indices into the first list.
environment.pickleThe build environment. This is always a pickle file, independent of the builder and a copy of the environment that was used when the builder was started.
Unlike the other pickle files this pickle file requires that the
sphinxpackage is available on unpickling.
The build configuration file
The configuration directory must contain a file named conf.py.
This file (containing Python code) is called the “build configuration file” and
contains all configuration needed to customize Sphinx input and output behavior.
The configuration file is executed as Python code at build time (using
execfile(), and with the current directory set to its containing
directory), and therefore can execute arbitrarily complex code. Sphinx then
reads simple names from the file’s namespace as its configuration.
Important points to note:
- If not otherwise documented, values must be strings, and their default is the empty string.
- The term “fully-qualified name” refers to a string that names an importable
Python object inside a module; for example, the FQN
"sphinx.builders.Builder"means theBuilderclass in thesphinx.buildersmodule. - Remember that document names use
/as the path separator and don’t contain the file name extension. - Since
conf.pyis read as a Python file, the usual rules apply for encodings and Unicode support: declare the encoding using an encoding cookie (a comment like# -*- coding: utf-8 -*-) and use Unicode string literals when you include non-ASCII characters in configuration values. - The contents of the config namespace are pickled (so that Sphinx can find out
when configuration changes), so it may not contain unpickleable values –
delete them from the namespace with
delif appropriate. Modules are removed automatically, so you don’t need todelyour imports after use. - There is a special object named
tagsavailable in the config file. It can be used to query and change the tags (see 包含基于标签的内容). Usetags.has('tag')to query,tags.add('tag')andtags.remove('tag')to change.
General configuration
Project information
Options for internationalization
These options influence Sphinx’ Native Language Support. See the documentation on Internationalization for details.
Options for HTML output
These options influence HTML as well as HTML Help output, and other builders that use Sphinx’ HTMLWriter class.
Options for epub output
These options influence the epub output. As this builder derives from the HTML builder, the HTML options also apply where appropriate. The actual values for some of the options is not really important, they just have to be entered into the Dublin Core metadata.
Options for LaTeX output
These options influence LaTeX output.
Options for text output
These options influence text output.
Options for manual page output
These options influence manual page output.
Options for Texinfo output
These options influence Texinfo output.
Options for the linkcheck builder
Footnotes
| [1] | A note on available globbing syntax: you can use the standard shell
constructs *, ?, [...] and [!...] with the feature that
these all don’t match slashes. A double star ** can be used to match
any sequence of characters including slashes. |
Internationalization
New in version 1.1.
Complementary to translations provided for Sphinx-generated messages such as navigation bars, Sphinx provides mechanisms facilitating document translations in itself. See the Options for internationalization for details on configuration.
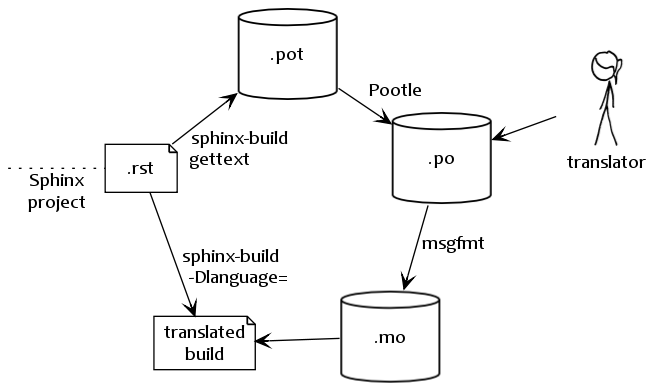
Workflow visualization of translations in Sphinx. (The stick-figure is taken from an XKCD comic.)
gettext [1] is an established standard for internationalization and localization. It naïvely maps messages in a program to a translated string. Sphinx uses these facilities to translate whole documents.
Initially project maintainers have to collect all translatable strings (also
referred to as messages) to make them known to translators. Sphinx extracts
these through invocation of sphinx-build -b gettext.
Every single element in the doctree will end up in a single message which results in lists being equally split into different chunks while large paragraphs will remain as coarsely-grained as they were in the original document. This grants seamless document updates while still providing a little bit of context for translators in free-text passages. It is the maintainer’s task to split up paragraphs which are too large as there is no sane automated way to do that.
After Sphinx successfully ran the
MessageCatalogBuilder you will find a collection
of .pot files in your output directory. These are catalog templates
and contain messages in your original language only.
They can be delivered to translators which will transform them to .po files
— so called message catalogs — containing a mapping from the original
messages to foreign-language strings.
Gettext compiles them into a binary format known as binary catalogs through msgfmt for efficiency reasons. If you make these files discoverable with :confval:`locale_dirs` for your :confval:`language`, Sphinx will pick them up automatically.
An example: you have a document usage.rst in your Sphinx project. The
gettext builder will put its messages into usage.pot. Imagine you have
Spanish translations [2] on your hands in usage.po — for your builds to
be translated you need to follow these instructions:
Compile your message catalog to a locale directory, say
translated, so it ends up in./translated/es/LC_MESSAGES/usage.moin your source directory (whereesis the language code for Spanish.)msgfmt "usage.po" -o "translated/es/LC_MESSAGES/usage.mo"
Set :confval:`locale_dirs` to
["translated/"].Set :confval:`language` to
es(also possible via-D).Run your desired build.
Footnotes
| [1] | See the GNU gettext utilites for details on that software suite. |
| [2] | Because nobody expects the Spanish Inquisition! |
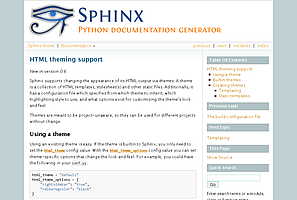
HTML theming support
New in version 0.6.
Sphinx supports changing the appearance of its HTML output via themes. A theme is a collection of HTML templates, stylesheet(s) and other static files. Additionally, it has a configuration file which specifies from which theme to inherit, which highlighting style to use, and what options exist for customizing the theme’s look and feel.
Themes are meant to be project-unaware, so they can be used for different projects without change.
Using a theme
Using an existing theme is easy. If the theme is builtin to Sphinx, you only
need to set the :confval:`html_theme` config value. With the
:confval:`html_theme_options` config value you can set theme-specific options
that change the look and feel. For example, you could have the following in
your conf.py:
html_theme = "default"
html_theme_options = {
    "rightsidebar": "true",
    "relbarbgcolor": "black"
}
That would give you the default theme, but with a sidebar on the right side and a black background for the relation bar (the bar with the navigation links at the page’s top and bottom).
If the theme does not come with Sphinx, it can be in two forms: either a
directory (containing theme.conf and other needed files), or a zip file
with the same contents. Either of them must be put where Sphinx can find it;
for this there is the config value :confval:`html_theme_path`. It gives a list
of directories, relative to the directory containing conf.py, that can
contain theme directories or zip files. For example, if you have a theme in the
file blue.zip, you can put it right in the directory containing
conf.py and use this configuration:
html_theme = "blue"
html_theme_path = ["."]
Builtin themes
| Theme overview | |
default |
sphinxdoc |
scrolls |
agogo |
traditional |
nature |
haiku |
pyramid |
Sphinx comes with a selection of themes to choose from.
These themes are:
basic – This is a basically unstyled layout used as the base for the other themes, and usable as the base for custom themes as well. The HTML contains all important elements like sidebar and relation bar. There are these options (which are inherited by the other themes):
- nosidebar (true or false): Don’t include the sidebar. Defaults to false.
- sidebarwidth (an integer): Width of the sidebar in pixels. (Do not
include
pxin the value.) Defaults to 230 pixels.
default – This is the default theme, which looks like the Python documentation. It can be customized via these options:
- rightsidebar (true or false): Put the sidebar on the right side. Defaults to false.
- stickysidebar (true or false): Make the sidebar “fixed” so that it doesn’t scroll out of view for long body content. This may not work well with all browsers. Defaults to false.
- collapsiblesidebar (true or false): Add an experimental JavaScript snippet that makes the sidebar collapsible via a button on its side. Doesn’t work together with “rightsidebar” or “stickysidebar”. Defaults to false.
- externalrefs (true or false): Display external links differently from internal links. Defaults to false.
There are also various color and font options that can change the color scheme without having to write a custom stylesheet:
- footerbgcolor (CSS color): Background color for the footer line.
- footertextcolor (CSS color): Text color for the footer line.
- sidebarbgcolor (CSS color): Background color for the sidebar.
- sidebarbtncolor (CSS color): Background color for the sidebar collapse button (used when collapsiblesidebar is true).
- sidebartextcolor (CSS color): Text color for the sidebar.
- sidebarlinkcolor (CSS color): Link color for the sidebar.
- relbarbgcolor (CSS color): Background color for the relation bar.
- relbartextcolor (CSS color): Text color for the relation bar.
- relbarlinkcolor (CSS color): Link color for the relation bar.
- bgcolor (CSS color): Body background color.
- textcolor (CSS color): Body text color.
- linkcolor (CSS color): Body link color.
- visitedlinkcolor (CSS color): Body color for visited links.
- headbgcolor (CSS color): Background color for headings.
- headtextcolor (CSS color): Text color for headings.
- headlinkcolor (CSS color): Link color for headings.
- codebgcolor (CSS color): Background color for code blocks.
- codetextcolor (CSS color): Default text color for code blocks, if not set differently by the highlighting style.
- bodyfont (CSS font-family): Font for normal text.
- headfont (CSS font-family): Font for headings.
sphinxdoc – The theme used for this documentation. It features a sidebar on the right side. There are currently no options beyond nosidebar and sidebarwidth.
scrolls – A more lightweight theme, based on the Jinja documentation. The following color options are available:
- headerbordercolor
- subheadlinecolor
- linkcolor
- visitedlinkcolor
- admonitioncolor
agogo – A theme created by Andi Albrecht. The following options are supported:
- bodyfont (CSS font family): Font for normal text.
- headerfont (CSS font family): Font for headings.
- pagewidth (CSS length): Width of the page content, default 70em.
- documentwidth (CSS length): Width of the document (without sidebar), default 50em.
- sidebarwidth (CSS length): Width of the sidebar, default 20em.
- bgcolor (CSS color): Background color.
- headerbg (CSS value for “background”): background for the header area, default a grayish gradient.
- footerbg (CSS value for “background”): background for the footer area, default a light gray gradient.
- linkcolor (CSS color): Body link color.
- headercolor1, headercolor2 (CSS color): colors for <h1> and <h2> headings.
- headerlinkcolor (CSS color): Color for the backreference link in headings.
- textalign (CSS text-align value): Text alignment for the body, default
is
justify.
nature – A greenish theme. There are currently no options beyond nosidebar and sidebarwidth.
pyramid – A theme from the Pyramid web framework project, designed by Blaise Laflamme. There are currently no options beyond nosidebar and sidebarwidth.
haiku – A theme without sidebar inspired by the Haiku OS user guide. The following options are supported:
- full_logo (true or false, default false): If this is true, the header will only show the :confval:`html_logo`. Use this for large logos. If this is false, the logo (if present) will be shown floating right, and the documentation title will be put in the header.
- textcolor, headingcolor, linkcolor, visitedlinkcolor, hoverlinkcolor (CSS colors): Colors for various body elements.
traditional – A theme resembling the old Python documentation. There are currently no options beyond nosidebar and sidebarwidth.
epub – A theme for the epub builder. There are currently no options. This theme tries to save visual space which is a sparse resource on ebook readers.
Creating themes
As said, themes are either a directory or a zipfile (whose name is the theme name), containing the following:
- A
theme.conffile, see below. - HTML templates, if needed.
- A
static/directory containing any static files that will be copied to the output static directory on build. These can be images, styles, script files.
The theme.conf file is in INI format [1] (readable by the standard
Python ConfigParser module) and has the following structure:
[theme]
inherit = base theme
stylesheet = main CSS name
pygments_style = stylename

[options]
variable = default value
- The inherit setting gives the name of a “base theme”, or
none. The base theme will be used to locate missing templates (most themes will not have to supply most templates if they usebasicas the base theme), its options will be inherited, and all of its static files will be used as well. - The stylesheet setting gives the name of a CSS file which will be
referenced in the HTML header. If you need more than one CSS file, either
include one from the other via CSS’
@import, or use a custom HTML template that adds<link rel="stylesheet">tags as necessary. Setting the :confval:`html_style` config value will override this setting. - The pygments_style setting gives the name of a Pygments style to use for highlighting. This can be overridden by the user in the :confval:`pygments_style` config value.
- The options section contains pairs of variable names and default values.
These options can be overridden by the user in :confval:`html_theme_options`
and are accessible from all templates as
theme_<name>.
Templating
The guide to templating is helpful if you want to write your own templates. What is important to keep in mind is the order in which Sphinx searches for templates:
- First, in the user’s
templates_pathdirectories. - Then, in the selected theme.
- Then, in its base theme, its base’s base theme, etc.
When extending a template in the base theme with the same name, use the theme
name as an explicit directory: {% extends "basic/layout.html" %}. From a
user templates_path template, you can still use the “exclamation mark”
syntax as described in the templating document.
Static templates
Since theme options are meant for the user to configure a theme more easily, without having to write a custom stylesheet, it is necessary to be able to template static files as well as HTML files. Therefore, Sphinx supports so-called “static templates”, like this:
If the name of a file in the static/ directory of a theme (or in the user’s
static path, for that matter) ends with _t, it will be processed by the
template engine. The _t will be left from the final file name. For
example, the default theme has a file static/default.css_t which uses
templating to put the color options into the stylesheet. When a documentation
is built with the default theme, the output directory will contain a
_static/default.css file where all template tags have been processed.
| [1] | It is not an executable Python file, as opposed to conf.py,
because that would pose an unnecessary security risk if themes are
shared. |
Templating
Sphinx uses the Jinja templating engine for its HTML templates. Jinja is a text-based engine, and inspired by Django templates, so anyone having used Django will already be familiar with it. It also has excellent documentation for those who need to make themselves familiar with it.
Do I need to use Sphinx’ templates to produce HTML?
No. You have several other options:
- You can write a
TemplateBridgesubclass that calls your template engine of choice, and set the :confval:`template_bridge` configuration value accordingly. - You can write a custom builder that derives from
StandaloneHTMLBuilderand calls your template engine of choice. - You can use the
PickleHTMLBuilderthat produces pickle files with the page contents, and postprocess them using a custom tool, or use them in your Web application.
Jinja/Sphinx Templating Primer
The default templating language in Sphinx is Jinja. It’s Django/Smarty inspired and easy to understand. The most important concept in Jinja is template inheritance, which means that you can overwrite only specific blocks within a template, customizing it while also keeping the changes at a minimum.
To customize the output of your documentation you can override all the templates (both the layout templates and the child templates) by adding files with the same name as the original filename into the template directory of the structure the Sphinx quickstart generated for you.
Sphinx will look for templates in the folders of :confval:`templates_path` first, and if it can’t find the template it’s looking for there, it falls back to the selected theme’s templates.
A template contains variables, which are replaced with values when the template is evaluated, tags, which control the logic of the template and blocks which are used for template inheritance.
Sphinx’ basic theme provides base templates with a couple of blocks it will
fill with data. These are located in the themes/basic subdirectory of
the Sphinx installation directory, and used by all builtin Sphinx themes.
Templates with the same name in the :confval:`templates_path` override templates
supplied by the selected theme.
For example, to add a new link to the template area containing related links all
you have to do is to add a new template called layout.html with the
following contents:
{% extends "!layout.html" %}
{% block rootrellink %}
<li><a href="http://project.invalid/">Project Homepage</a> »</li>
{{ super() }}
{% endblock %}
By prefixing the name of the overridden template with an exclamation mark, Sphinx will load the layout template from the underlying HTML theme.
Important: If you override a block, call {{ super() }} somewhere to
render the block’s content in the extended template – unless you don’t want
that content to show up.
Working with the builtin templates
The builtin basic theme supplies the templates that all builtin Sphinx themes are based on. It has the following elements you can override or use:
Blocks
The following blocks exist in the layout.html template:
- doctype
- The doctype of the output format. By default this is XHTML 1.0 Transitional as this is the closest to what Sphinx and Docutils generate and it’s a good idea not to change it unless you want to switch to HTML 5 or a different but compatible XHTML doctype.
- linktags
- This block adds a couple of
<link>tags to the head section of the template. - extrahead
- This block is empty by default and can be used to add extra contents into
the
<head>tag of the generated HTML file. This is the right place to add references to JavaScript or extra CSS files. - relbar1 / relbar2
This block contains the relation bar, the list of related links (the parent documents on the left, and the links to index, modules etc. on the right). relbar1 appears before the document, relbar2 after the document. By default, both blocks are filled; to show the relbar only before the document, you would override relbar2 like this:
{% block relbar2 %}{% endblock %}
- rootrellink / relbaritems
- Inside the relbar there are three sections: The rootrellink, the links
from the documentation and the custom relbaritems. The rootrellink is a
block that by default contains a list item pointing to the master document
by default, the relbaritems is an empty block. If you override them to
add extra links into the bar make sure that they are list items and end with
the
reldelim1. - document
- The contents of the document itself. It contains the block “body” where the
individual content is put by subtemplates like
page.html. - sidebar1 / sidebar2
A possible location for a sidebar. sidebar1 appears before the document and is empty by default, sidebar2 after the document and contains the default sidebar. If you want to swap the sidebar location override this and call the sidebar helper:
{% block sidebar1 %}{{ sidebar() }}{% endblock %}
{% block sidebar2 %}{% endblock %}
(The sidebar2 location for the sidebar is needed by the
sphinxdoc.cssstylesheet, for example.)- sidebarlogo
- The logo location within the sidebar. Override this if you want to place some content at the top of the sidebar.
- footer
- The block for the footer div. If you want a custom footer or markup before or after it, override this one.
The following four blocks are only used for pages that do not have assigned a list of custom sidebars in the :confval:`html_sidebars` config value. Their use is deprecated in favor of separate sidebar templates, which can be included via :confval:`html_sidebars`.
- sidebartoc
The table of contents within the sidebar.
Deprecated since version 1.0.
- sidebarrel
The relation links (previous, next document) within the sidebar.
Deprecated since version 1.0.
- sidebarsourcelink
The “Show source” link within the sidebar (normally only shown if this is enabled by :confval:`html_show_sourcelink`).
Deprecated since version 1.0.
- sidebarsearch
The search box within the sidebar. Override this if you want to place some content at the bottom of the sidebar.
Deprecated since version 1.0.
Configuration Variables
Inside templates you can set a couple of variables used by the layout template
using the {% set %} tag:
-
reldelim1 The delimiter for the items on the left side of the related bar. This defaults to
' »'Each item in the related bar ends with the value of this variable.
-
reldelim2 The delimiter for the items on the right side of the related bar. This defaults to
' |'. Each item except of the last one in the related bar ends with the value of this variable.
Overriding works like this:
{% extends "!layout.html" %}
{% set reldelim1 = ' >' %}
-
script_files Add additional script files here, like this:
{% set script_files = script_files + ["_static/myscript.js"] %}
-
css_files Similar to
script_files, for CSS files.
Helper Functions
Sphinx provides various Jinja functions as helpers in the template. You can use them to generate links or output multiply used elements.
-
pathto(document) Return the path to a Sphinx document as a URL. Use this to refer to built documents.
-
pathto(file, 1) Return the path to a file which is a filename relative to the root of the generated output. Use this to refer to static files.
-
hasdoc(document) Check if a document with the name document exists.
Return the rendered sidebar.
-
relbar() Return the rendered relation bar.
Global Variables
These global variables are available in every template and are safe to use. There are more, but most of them are an implementation detail and might change in the future.
-
builder The name of the builder (e.g.
htmlorhtmlhelp).
-
copyright The value of :confval:`copyright`.
-
docstitle The title of the documentation (the value of :confval:`html_title`).
-
embedded True if the built HTML is meant to be embedded in some viewing application that handles navigation, not the web browser, such as for HTML help or Qt help formats. In this case, the sidebar is not included.
-
favicon The path to the HTML favicon in the static path, or
''.
-
file_suffix The value of the builder’s
out_suffixattribute, i.e. the file name extension that the output files will get. For a standard HTML builder, this is usually.html.
-
has_source True if the reST document sources are copied (if :confval:`html_copy_source` is true).
-
last_updated The build date.
-
logo The path to the HTML logo image in the static path, or
''.
-
master_doc The value of :confval:`master_doc`, for usage with
pathto().
-
next The next document for the navigation. This variable is either false or has two attributes link and title. The title contains HTML markup. For example, to generate a link to the next page, you can use this snippet:
{% if next %}
<a href="{{ next.link|e }}">{{ next.title }}</a>
{% endif %}
-
pagename The “page name” of the current file, i.e. either the document name if the file is generated from a reST source, or the equivalent hierarchical name relative to the output directory (
[directory/]filename_without_extension).
-
parents A list of parent documents for navigation, structured like the
nextitem.
-
prev Like
next, but for the previous page.
-
project The value of :confval:`project`.
-
release The value of :confval:`release`.
-
rellinks A list of links to put at the left side of the relbar, next to “next” and “prev”. This usually contains links to the general index and other indices, such as the Python module index. If you add something yourself, it must be a tuple
(pagename, link title, accesskey, link text).
-
shorttitle The value of :confval:`html_short_title`.
-
show_source True if :confval:`html_show_sourcelink` is true.
-
sphinx_version The version of Sphinx used to build.
-
style The name of the main stylesheet, as given by the theme or :confval:`html_style`.
-
title The title of the current document, as used in the
<title>tag.
-
use_opensearch The value of :confval:`html_use_opensearch`.
-
version The value of :confval:`version`.
In addition to these values, there are also all theme options available
(prefixed by theme_), as well as the values given by the user in
:confval:`html_context`.
In documents that are created from source files (as opposed to automatically-generated files like the module index, or documents that already are in HTML form), these variables are also available:
-
meta Document metadata (a dictionary), see 文件范围的元数据.
-
sourcename The name of the copied source file for the current document. This is only nonempty if the :confval:`html_copy_source` value is true.
-
toc The local table of contents for the current page, rendered as HTML bullet lists.
-
toctree A callable yielding the global TOC tree containing the current page, rendered as HTML bullet lists. Optional keyword arguments:
collapse(true by default): if true, all TOC entries that are not ancestors of the current page are collapsedmaxdepth(defaults to the max depth selected in the toctree directive): the maximum depth of the tree; set it to-1to allow unlimited depthtitles_only(false by default): if true, put only toplevel document titles in the tree
Sphinx Extensions
Since many projects will need special features in their documentation, Sphinx is designed to be extensible on several levels.
This is what you can do in an extension: First, you can add new builders to support new output formats or actions on the parsed documents. Then, it is possible to register custom reStructuredText roles and directives, extending the markup. And finally, there are so-called “hook points” at strategic places throughout the build process, where an extension can register a hook and run specialized code.
An extension is simply a Python module. When an extension is loaded, Sphinx
imports this module and executes its setup() function, which in turn
notifies Sphinx of everything the extension offers – see the extension tutorial
for examples.
The configuration file itself can be treated as an extension if it contains a
setup() function. All other extensions to load must be listed in the
:confval:`extensions` configuration value.
Tutorial: Writing a simple extension
This section is intended as a walkthrough for the creation of custom extensions. It covers the basics of writing and activating an extensions, as well as commonly used features of extensions.
As an example, we will cover a “todo” extension that adds capabilities to include todo entries in the documentation, and collecting these in a central place. (A similar “todo” extension is distributed with Sphinx.)
Build Phases
One thing that is vital in order to understand extension mechanisms is the way in which a Sphinx project is built: this works in several phases.
Phase 0: Initialization
In this phase, almost nothing interesting for us happens. The source directory is searched for source files, and extensions are initialized. Should a stored build environment exist, it is loaded, otherwise a new one is created.
Phase 1: Reading
In Phase 1, all source files (and on subsequent builds, those that are new or changed) are read and parsed. This is the phase where directives and roles are encountered by the docutils, and the corresponding functions are called. The output of this phase is a doctree for each source files, that is a tree of docutils nodes. For document elements that aren’t fully known until all existing files are read, temporary nodes are created.
During reading, the build environment is updated with all meta- and cross reference data of the read documents, such as labels, the names of headings, described Python objects and index entries. This will later be used to replace the temporary nodes.
The parsed doctrees are stored on the disk, because it is not possible to hold all of them in memory.
Phase 2: Consistency checks
Some checking is done to ensure no surprises in the built documents.
Phase 3: Resolving
Now that the metadata and cross-reference data of all existing documents is known, all temporary nodes are replaced by nodes that can be converted into output. For example, links are created for object references that exist, and simple literal nodes are created for those that don’t.
Phase 4: Writing
This phase converts the resolved doctrees to the desired output format, such as HTML or LaTeX. This happens via a so-called docutils writer that visits the individual nodes of each doctree and produces some output in the process.
Note
Some builders deviate from this general build plan, for example, the builder that checks external links does not need anything more than the parsed doctrees and therefore does not have phases 2–4.
Extension Design
We want the extension to add the following to Sphinx:
- A “todo” directive, containing some content that is marked with “TODO”, and only shown in the output if a new config value is set. (Todo entries should not be in the output by default.)
- A “todolist” directive that creates a list of all todo entries throughout the documentation.
For that, we will need to add the following elements to Sphinx:
- New directives, called
todoandtodolist. - New document tree nodes to represent these directives, conventionally also
called
todoandtodolist. We wouldn’t need new nodes if the new directives only produced some content representable by existing nodes. - A new config value
todo_include_todos(config value names should start with the extension name, in order to stay unique) that controls whether todo entries make it into the output. - New event handlers: one for the :event:`doctree-resolved` event, to replace the todo and todolist nodes, and one for :event:`env-purge-doc` (the reason for that will be covered later).
The Setup Function
The new elements are added in the extension’s setup function. Let us create a
new Python module called todo.py and add the setup function:
def setup(app):
    app.add_config_value('todo_include_todos', False, False)

    app.add_node(todolist)
    app.add_node(todo,
                 html=(visit_todo_node, depart_todo_node),
                 latex=(visit_todo_node, depart_todo_node),
                 text=(visit_todo_node, depart_todo_node))

    app.add_directive('todo', TodoDirective)
    app.add_directive('todolist', TodolistDirective)
    app.connect('doctree-resolved', process_todo_nodes)
    app.connect('env-purge-doc', purge_todos)
The calls in this function refer to classes and functions not yet written. What the individual calls do is the following:
add_config_value()lets Sphinx know that it should recognize the new config valuetodo_include_todos, whose default value should beFalse(this also tells Sphinx that it is a boolean value).If the third argument was
True, all documents would be re-read if the config value changed its value. This is needed for config values that influence reading (build phase 1).add_node()adds a new node class to the build system. It also can specify visitor functions for each supported output format. These visitor functions are needed when the new nodes stay until phase 4 – since thetodolistnode is always replaced in phase 3, it doesn’t need any.We need to create the two node classes
todoandtodolistlater.add_directive()adds a new directive, given by name and class.The handler functions are created later.
Finally,
connect()adds an event handler to the event whose name is given by the first argument. The event handler function is called with several arguments which are documented with the event.
The Node Classes
Let’s start with the node classes:
from docutils import nodes

class todo(nodes.Admonition, nodes.Element):
    pass

class todolist(nodes.General, nodes.Element):
    pass

def visit_todo_node(self, node):
    self.visit_admonition(node)

def depart_todo_node(self, node):
    self.depart_admonition(node)
Node classes usually don’t have to do anything except inherit from the standard
docutils classes defined in docutils.nodes. todo inherits from
Admonition because it should be handled like a note or warning, todolist
is just a “general” node.
The Directive Classes
A directive class is a class deriving usually from
docutils.parsers.rst.Directive. Since the class-based directive interface
doesn’t exist yet in Docutils 0.4, Sphinx has another base class called
sphinx.util.compat.Directive that you can derive your directive from, and it
will work with both Docutils 0.4 and 0.5 upwards. The directive interface is
covered in detail in the docutils documentation; the important thing is that the
class has a method run that returns a list of nodes.
The todolist directive is quite simple:
from sphinx.util.compat import Directive

class TodolistDirective(Directive):

    def run(self):
        return [todolist('')]
An instance of our todolist node class is created and returned. The
todolist directive has neither content nor arguments that need to be handled.
The todo directive function looks like this:
from sphinx.util.compat import make_admonition

class TodoDirective(Directive):

    # this enables content in the directive
    has_content = True

    def run(self):
        env = self.state.document.settings.env

        targetid = "todo-%d" % env.new_serialno('todo')
        targetnode = nodes.target('', '', ids=[targetid])

        ad = make_admonition(todo, self.name, [_('Todo')], self.options,
                             self.content, self.lineno, self.content_offset,
                             self.block_text, self.state, self.state_machine)

        if not hasattr(env, 'todo_all_todos'):
            env.todo_all_todos = []
        env.todo_all_todos.append({
            'docname': env.docname,
            'lineno': self.lineno,
            'todo': ad[0].deepcopy(),
            'target': targetnode,
        })

        return [targetnode] + ad
Several important things are covered here. First, as you can see, you can refer
to the build environment instance using self.state.document.settings.env.
Then, to act as a link target (from the todolist), the todo directive needs to
return a target node in addition to the todo node. The target ID (in HTML, this
will be the anchor name) is generated by using env.new_serialno which is
returns a new integer directive on each call and therefore leads to unique
target names. The target node is instantiated without any text (the first two
arguments).
An admonition is created using a standard docutils function (wrapped in Sphinx
for docutils cross-version compatibility). The first argument gives the node
class, in our case todo. The third argument gives the admonition title (use
arguments here to let the user specify the title). A list of nodes is
returned from make_admonition.
Then, the todo node is added to the environment. This is needed to be able to
create a list of all todo entries throughout the documentation, in the place
where the author puts a todolist directive. For this case, the environment
attribute todo_all_todos is used (again, the name should be unique, so it is
prefixed by the extension name). It does not exist when a new environment is
created, so the directive must check and create it if necessary. Various
information about the todo entry’s location are stored along with a copy of the
node.
In the last line, the nodes that should be put into the doctree are returned: the target node and the admonition node.
The node structure that the directive returns looks like this:
+--------------------+
| target node        |
+--------------------+
+--------------------+
| todo node          |
+--------------------+
  \__+--------------------+
     | admonition title   |
     +--------------------+
     | paragraph          |
     +--------------------+
     | ...                |
     +--------------------+
The Event Handlers
Finally, let’s look at the event handlers. First, the one for the :event:`env-purge-doc` event:
def purge_todos(app, env, docname):
    if not hasattr(env, 'todo_all_todos'):
        return
    env.todo_all_todos = [todo for todo in env.todo_all_todos
                          if todo['docname'] != docname]
Since we store information from source files in the environment, which is
persistent, it may become out of date when the source file changes. Therefore,
before each source file is read, the environment’s records of it are cleared,
and the :event:`env-purge-doc` event gives extensions a chance to do the same.
Here we clear out all todos whose docname matches the given one from the
todo_all_todos list. If there are todos left in the document, they will be
added again during parsing.
The other handler belongs to the :event:`doctree-resolved` event. This event is emitted at the end of phase 3 and allows custom resolving to be done:
def process_todo_nodes(app, doctree, fromdocname):
    if not app.config.todo_include_todos:
        for node in doctree.traverse(todo):
            node.parent.remove(node)

    # Replace all todolist nodes with a list of the collected todos.
    # Augment each todo with a backlink to the original location.
    env = app.builder.env

    for node in doctree.traverse(todolist):
        if not app.config.todo_include_todos:
            node.replace_self([])
            continue

        content = []

        for todo_info in env.todo_all_todos:
            para = nodes.paragraph()
            filename = env.doc2path(todo_info['docname'], base=None)
            description = (
                _('(The original entry is located in %s, line %d and can be found ') %
                (filename, todo_info['lineno']))
            para += nodes.Text(description, description)

            # Create a reference
            newnode = nodes.reference('', '')
            innernode = nodes.emphasis(_('here'), _('here'))
            newnode['refdocname'] = todo_info['docname']
            newnode['refuri'] = app.builder.get_relative_uri(
                fromdocname, todo_info['docname'])
            newnode['refuri'] += '#' + todo_info['target']['refid']
            newnode.append(innernode)
            para += newnode
            para += nodes.Text('.)', '.)')

            # Insert into the todolist
            content.append(todo_info['todo'])
            content.append(para)

        node.replace_self(content)
It is a bit more involved. If our new “todo_include_todos” config value is false, all todo and todolist nodes are removed from the documents.
If not, todo nodes just stay where and how they are. Todolist nodes are
replaced by a list of todo entries, complete with backlinks to the location
where they come from. The list items are composed of the nodes from the todo
entry and docutils nodes created on the fly: a paragraph for each entry,
containing text that gives the location, and a link (reference node containing
an italic node) with the backreference. The reference URI is built by
app.builder.get_relative_uri which creates a suitable URI depending on the
used builder, and appending the todo node’s (the target’s) ID as the anchor
name.
Extension API
Each Sphinx extension is a Python module with at least a setup() function.
This function is called at initialization time with one argument, the
application object representing the Sphinx process. This application object has
the following public API:
-
Sphinx.setup_extension(name) Load the extension given by the module name. Use this if your extension needs the features provided by another extension.
-
Sphinx.add_builder(builder) Register a new builder. builder must be a class that inherits from
Builder.
-
Sphinx.add_config_value(name, default, rebuild) Register a configuration value. This is necessary for Sphinx to recognize new values and set default values accordingly. The name should be prefixed with the extension name, to avoid clashes. The default value can be any Python object. The string value rebuild must be one of those values:
'env'if a change in the setting only takes effect when a document is parsed – this means that the whole environment must be rebuilt.'html'if a change in the setting needs a full rebuild of HTML documents.''if a change in the setting will not need any special rebuild.
Changed in version 0.4: If the default value is a callable, it will be called with the config object as its argument in order to get the default value. This can be used to implement config values whose default depends on other values.
Changed in version 0.6: Changed rebuild from a simple boolean (equivalent to
''or'env') to a string. However, booleans are still accepted and converted internally.
-
Sphinx.add_domain(domain) Make the given domain (which must be a class; more precisely, a subclass of
Domain) known to Sphinx.New in version 1.0.
-
Sphinx.override_domain(domain) Make the given domain class known to Sphinx, assuming that there is already a domain with its
.name. The new domain must be a subclass of the existing one.New in version 1.0.
-
Sphinx.add_index_to_domain(domain, index) Add a custom index class to the domain named domain. index must be a subclass of
Index.New in version 1.0.
-
Sphinx.add_event(name) Register an event called name. This is needed to be able to emit it.
-
Sphinx.add_node(node, **kwds) Register a Docutils node class. This is necessary for Docutils internals. It may also be used in the future to validate nodes in the parsed documents.
Node visitor functions for the Sphinx HTML, LaTeX, text and manpage writers can be given as keyword arguments: the keyword must be one or more of
'html','latex','text','man','texinfo', the value a 2-tuple of(visit, depart)methods.departcan beNoneif thevisitfunction raisesdocutils.nodes.SkipNode. Example:class math(docutils.nodes.Element): pass def visit_math_html(self, node): self.body.append(self.starttag(node, 'math')) def depart_math_html(self, node): self.body.append('</math>') app.add_node(math, html=(visit_math_html, depart_math_html))
Obviously, translators for which you don’t specify visitor methods will choke on the node when encountered in a document to translate.
Changed in version 0.5: Added the support for keyword arguments giving visit functions.
-
Sphinx.add_directive(name, func, content, arguments, **options) -
Sphinx.add_directive(name, directiveclass) Register a Docutils directive. name must be the prospective directive name. There are two possible ways to write a directive:
In the docutils 0.4 style, obj is the directive function. content, arguments and options are set as attributes on the function and determine whether the directive has content, arguments and options, respectively. This style is deprecated.
In the docutils 0.5 style, directiveclass is the directive class. It must already have attributes named has_content, required_arguments, optional_arguments, final_argument_whitespace and option_spec that correspond to the options for the function way. See the Docutils docs for details.
The directive class must inherit from the class
docutils.parsers.rst.Directive.
For example, the (already existing)
literalincludedirective would be added like this:from docutils.parsers.rst import directives add_directive('literalinclude', literalinclude_directive, content = 0, arguments = (1, 0, 0), linenos = directives.flag, language = direcitves.unchanged, encoding = directives.encoding)
Changed in version 0.6: Docutils 0.5-style directive classes are now supported.
-
Sphinx.add_directive_to_domain(domain, name, func, content, arguments, **options) -
Sphinx.add_directive_to_domain(domain, name, directiveclass) Like
add_directive(), but the directive is added to the domain named domain.New in version 1.0.
-
Sphinx.add_role(name, role) Register a Docutils role. name must be the role name that occurs in the source, role the role function (see the Docutils documentation on details).
-
Sphinx.add_role_to_domain(domain, name, role) Like
add_role(), but the role is added to the domain named domain.New in version 1.0.
-
Sphinx.add_generic_role(name, nodeclass) Register a Docutils role that does nothing but wrap its contents in the node given by nodeclass.
New in version 0.6.
-
Sphinx.add_object_type(directivename, rolename, indextemplate='', parse_node=None, ref_nodeclass=None, objname='', doc_field_types=[]) This method is a very convenient way to add a new object type that can be cross-referenced. It will do this:
- Create a new directive (called directivename) for documenting an object.
It will automatically add index entries if indextemplate is nonempty; if
given, it must contain exactly one instance of
%s. See the example below for how the template will be interpreted. - Create a new role (called rolename) to cross-reference to these object descriptions.
- If you provide parse_node, it must be a function that takes a string and
a docutils node, and it must populate the node with children parsed from
the string. It must then return the name of the item to be used in
cross-referencing and index entries. See the
conf.pyfile in the source for this documentation for an example. - The objname (if not given, will default to directivename) names the type of object. It is used when listing objects, e.g. in search results.
For example, if you have this call in a custom Sphinx extension:
app.add_object_type('directive', 'dir', 'pair: %s; directive')you can use this markup in your documents:
.. rst:directive:: function

   Document a function.

<...>

See also the :rst:dir:`function` directive.
For the directive, an index entry will be generated as if you had prepended
.. index:: pair: function; directive
The reference node will be of class
literal(so it will be rendered in a proportional font, as appropriate for code) unless you give the ref_nodeclass argument, which must be a docutils node class (most useful aredocutils.nodes.emphasisordocutils.nodes.strong– you can also usedocutils.nodes.generatedif you want no further text decoration).For the role content, you have the same syntactical possibilities as for standard Sphinx roles (see 交叉索引的语法).
This method is also available under the deprecated alias
add_description_unit.- Create a new directive (called directivename) for documenting an object.
It will automatically add index entries if indextemplate is nonempty; if
given, it must contain exactly one instance of
-
Sphinx.add_crossref_type(directivename, rolename, indextemplate='', ref_nodeclass=None, objname='') This method is very similar to
add_object_type()except that the directive it generates must be empty, and will produce no output.That means that you can add semantic targets to your sources, and refer to them using custom roles instead of generic ones (like
ref). Example call:app.add_crossref_type('topic', 'topic', 'single: %s', docutils.nodes.emphasis)Example usage:
.. topic:: application API

The application API
-------------------

<...>

See also :topic:`this section <application API>`.
(Of course, the element following the
topicdirective needn’t be a section.)
-
Sphinx.add_transform(transform) Add the standard docutils
Transformsubclass transform to the list of transforms that are applied after Sphinx parses a reST document.
-
Sphinx.add_javascript(filename) Add filename to the list of JavaScript files that the default HTML template will include. The filename must be relative to the HTML static path, see :confval:`the docs for the config value <html_static_path>`. A full URI with scheme, like
http://example.org/foo.js, is also supported.New in version 0.5.
-
Sphinx.add_stylesheet(filename) Add filename to the list of CSS files that the default HTML template will include. Like for
add_javascript(), the filename must be relative to the HTML static path, or a full URI with scheme.New in version 1.0.
-
Sphinx.add_lexer(alias, lexer) Use lexer, which must be an instance of a Pygments lexer class, to highlight code blocks with the given language alias.
New in version 0.6.
-
Sphinx.add_autodocumenter(cls) Add cls as a new documenter class for the
sphinx.ext.autodocextension. It must be a subclass ofsphinx.ext.autodoc.Documenter. This allows to auto-document new types of objects. See the source of the autodoc module for examples on how to subclassDocumenter.New in version 0.6.
-
Sphinx.add_autodoc_attrgetter(type, getter) Add getter, which must be a function with an interface compatible to the
getattr()builtin, as the autodoc attribute getter for objects that are instances of type. All cases where autodoc needs to get an attribute of a type are then handled by this function instead ofgetattr().New in version 0.6.
-
Sphinx.add_search_language(cls) Add cls, which must be a subclass of
sphinx.search.SearchLanguage, as a support language for building the HTML full-text search index. The class must have a lang attribute that indicates the language it should be used for. See :confval:`html_search_language`.New in version 1.1.
-
Sphinx.connect(event, callback) Register callback to be called when event is emitted. For details on available core events and the arguments of callback functions, please see Sphinx core events.
The method returns a “listener ID” that can be used as an argument to
disconnect().
-
Sphinx.disconnect(listener_id) Unregister callback listener_id.
-
Sphinx.emit(event, *arguments) Emit event and pass arguments to the callback functions. Return the return values of all callbacks as a list. Do not emit core Sphinx events in extensions!
-
Sphinx.emit_firstresult(event, *arguments) Emit event and pass arguments to the callback functions. Return the result of the first callback that doesn’t return
None.New in version 0.5.
-
Sphinx.require_sphinx(version) Compare version (which must be a
major.minorversion string, e.g.'1.1') with the version of the running Sphinx, and abort the build when it is too old.New in version 1.0.
-
exception
sphinx.application.ExtensionError All these functions raise this exception if something went wrong with the extension API.
Examples of using the Sphinx extension API can be seen in the sphinx.ext
package.
Sphinx core events
These events are known to the core. The arguments shown are given to the registered event handlers.
The template bridge
Domain API
Writing new builders
-
class
sphinx.builders.Builder This is the base class for all builders.
These methods are predefined and will be called from the application:
These methods can be overridden in concrete builder classes:
Builtin Sphinx extensions
These extensions are built in and can be activated by respective entries in the :confval:`extensions` configuration value:
sphinx.ext.autodoc – Include documentation from docstrings
This extension can import the modules you are documenting, and pull in documentation from docstrings in a semi-automatic way.
Note
For Sphinx (actually, the Python interpreter that executes Sphinx) to find
your module, it must be importable. That means that the module or the
package must be in one of the directories on sys.path – adapt your
sys.path in the configuration file accordingly.
For this to work, the docstrings must of course be written in correct reStructuredText. You can then use all of the usual Sphinx markup in the docstrings, and it will end up correctly in the documentation. Together with hand-written documentation, this technique eases the pain of having to maintain two locations for documentation, while at the same time avoiding auto-generated-looking pure API documentation.
autodoc provides several directives that are versions of the usual
py:module, py:class and so forth. On parsing time, they
import the corresponding module and extract the docstring of the given objects,
inserting them into the page source under a suitable py:module,
py:class etc. directive.
Note
Just as py:class respects the current py:module,
autoclass will also do so. Likewise, automethod will
respect the current py:class.
-
.. automodule:: -
.. autoclass:: -
.. autoexception:: Document a module, class or exception. All three directives will by default only insert the docstring of the object itself:
.. autoclass:: Noodle
will produce source like this:
.. class:: Noodle

   Noodle's docstring.
The “auto” directives can also contain content of their own, it will be inserted into the resulting non-auto directive source after the docstring (but before any automatic member documentation).
Therefore, you can also mix automatic and non-automatic member documentation, like so:
.. autoclass:: Noodle
   :members: eat, slurp

   .. method:: boil(time=10)

      Boil the noodle *time* minutes.
Options and advanced usage
If you want to automatically document members, there’s a
membersoption:.. automodule:: noodle :members:
will document all module members (recursively), and
.. autoclass:: Noodle
   :members:
will document all non-private member functions and properties (that is, those whose name doesn’t start with
_).For modules,
__all__will be respected when looking for members; the order of the members will also be the order in__all__.You can also give an explicit list of members; only these will then be documented:
.. autoclass:: Noodle
   :members: eat, slurp
If you want to make the
membersoption (or other flag options described below) the default, see :confval:`autodoc_default_flags`.Members without docstrings will be left out, unless you give the
undoc-membersflag option:.. automodule:: noodle :members: :undoc-members:
“Private” members (that is, those named like
_privateor__private) will be included if theprivate-membersflag option is given.New in version 1.1.
Python “special” members (that is, those named like
__special__) will be included if thespecial-membersflag option is given:.. autoclass:: my.Class :members: :private-members: :special-members:
would document both “private” and “special” members of the class.
New in version 1.1.
For classes and exceptions, members inherited from base classes will be left out when documenting all members, unless you give the
inherited-membersflag option, in addition tomembers:.. autoclass:: Noodle :members: :inherited-members:
This can be combined with
undoc-membersto document all available members of the class or module.Note: this will lead to markup errors if the inherited members come from a module whose docstrings are not reST formatted.
New in version 0.3.
It’s possible to override the signature for explicitly documented callable objects (functions, methods, classes) with the regular syntax that will override the signature gained from introspection:
.. autoclass:: Noodle(type)

   .. automethod:: eat(persona)
This is useful if the signature from the method is hidden by a decorator.
New in version 0.4.
The
automodule,autoclassandautoexceptiondirectives also support a flag option calledshow-inheritance. When given, a list of base classes will be inserted just below the class signature (when used withautomodule, this will be inserted for every class that is documented in the module).New in version 0.4.
All autodoc directives support the
noindexflag option that has the same effect as for standardpy:functionetc. directives: no index entries are generated for the documented object (and all autodocumented members).New in version 0.4.
automodulealso recognizes thesynopsis,platformanddeprecatedoptions that the standardpy:moduledirective supports.New in version 0.5.
automoduleandautoclassalso has anmember-orderoption that can be used to override the global value of :confval:`autodoc_member_order` for one directive.New in version 0.6.
The directives supporting member documentation also have a
exclude-membersoption that can be used to exclude single member names from documentation, if all members are to be documented.New in version 0.6.
Note
In an
automoduledirective with themembersoption set, only module members whose__module__attribute is equal to the module name as given toautomodulewill be documented. This is to prevent documentation of imported classes or functions.
-
.. autofunction:: -
.. autodata:: -
.. automethod:: -
.. autoattribute:: These work exactly like
autoclassetc., but do not offer the options used for automatic member documentation.For module data members and class attributes, documentation can either be put into a special-formatted comment, or in a docstring after the definition. Comments need to be either on a line of their own before the definition, or immediately after the assignment on the same line. The latter form is restricted to one line only.
This means that in the following class definition, all attributes can be autodocumented:
class Foo:
    """Docstring for class Foo."""

    #: Doc comment for class attribute Foo.bar.
    #: It can have multiple lines.
    bar = 1

    flox = 1.5   #: Doc comment for Foo.flox. One line only.

    baz = 2
    """Docstring for class attribute Foo.baz."""

    def __init__(self):
        #: Doc comment for instance attribute qux.
        self.qux = 3

        self.spam = 4
        """Docstring for instance attribute spam."""
Changed in version 0.6:
autodataandautoattributecan now extract docstrings.Changed in version 1.1: Comment docs are now allowed on the same line after an assignment.
Note
If you document decorated functions or methods, keep in mind that autodoc retrieves its docstrings by importing the module and inspecting the
__doc__attribute of the given function or method. That means that if a decorator replaces the decorated function with another, it must copy the original__doc__to the new function.From Python 2.5,
functools.wraps()can be used to create well-behaved decorating functions.
There are also new config values that you can set:
Docstring preprocessing
autodoc provides the following additional events:
The sphinx.ext.autodoc module provides factory functions for commonly
needed docstring processing in event :event:`autodoc-process-docstring`:
Skipping members
autodoc allows the user to define a custom method for determining whether a member should be included in the documentation by using the following event:
sphinx.ext.autosummary – Generate autodoc summaries
New in version 0.6.
This extension generates function/method/attribute summary lists, similar to those output e.g. by Epydoc and other API doc generation tools. This is especially useful when your docstrings are long and detailed, and putting each one of them on a separate page makes them easier to read.
The sphinx.ext.autosummary extension does this in two parts:
- There is an
autosummarydirective for generating summary listings that contain links to the documented items, and short summary blurbs extracted from their docstrings. - Optionally, the convenience script sphinx-autogen or the new
:confval:`autosummary_generate` config value can be used to generate short
“stub” files for the entries listed in the
autosummarydirectives. These files by default contain only the correspondingsphinx.ext.autodocdirective, but can be customized with templates.
-
.. autosummary:: Insert a table that contains links to documented items, and a short summary blurb (the first sentence of the docstring) for each of them.
The
autosummarydirective can also optionally serve as atoctreeentry for the included items. Optionally, stub.rstfiles for these items can also be automatically generated.For example,
.. currentmodule:: sphinx

.. autosummary::

   environment.BuildEnvironment
   util.relative_uri
produces a table like this:
Autosummary preprocesses the docstrings and signatures with the same :event:`autodoc-process-docstring` and :event:`autodoc-process-signature` hooks as
autodoc.Options
If you want the
autosummarytable to also serve as atoctreeentry, use thetoctreeoption, for example:.. autosummary:: :toctree: DIRNAME sphinx.environment.BuildEnvironment sphinx.util.relative_uri
The
toctreeoption also signals to the sphinx-autogen script that stub pages should be generated for the entries listed in this directive. The option accepts a directory name as an argument; sphinx-autogen will by default place its output in this directory. If no argument is given, output is placed in the same directory as the file that contains the directive.If you don’t want the
autosummaryto show function signatures in the listing, include thenosignaturesoption:.. autosummary:: :nosignatures: sphinx.environment.BuildEnvironment sphinx.util.relative_uri
You can specify a custom template with the
templateoption. For example,.. autosummary:: :template: mytemplate.rst sphinx.environment.BuildEnvironment
would use the template
mytemplate.rstin your :confval:`templates_path` to generate the pages for all entries listed. See Customizing templates below.New in version 1.0.
sphinx-autogen – generate autodoc stub pages
The sphinx-autogen script can be used to conveniently generate stub
documentation pages for items included in autosummary listings.
For example, the command
$ sphinx-autogen -o generated *.rst
will read all autosummary tables in the *.rst files that have the
:toctree: option set, and output corresponding stub pages in directory
generated for all documented items. The generated pages by default contain
text of the form:
sphinx.util.relative_uri
========================

.. autofunction:: sphinx.util.relative_uri
If the -o option is not given, the script will place the output files in the
directories specified in the :toctree: options.
Generating stub pages automatically
If you do not want to create stub pages with sphinx-autogen, you can also use this new config value:
Customizing templates
New in version 1.0.
You can customize the stub page templates, in a similar way as the HTML Jinja
templates, see Templating. (TemplateBridge
is not supported.)
Note
If you find yourself spending much time tailoring the stub templates, this may indicate that it’s a better idea to write custom narrative documentation instead.
Autosummary uses the following template files:
autosummary/base.rst– fallback templateautosummary/module.rst– template for modulesautosummary/class.rst– template for classesautosummary/function.rst– template for functionsautosummary/attribute.rst– template for class attributesautosummary/method.rst– template for class methods
The following variables available in the templates:
-
name Name of the documented object, excluding the module and class parts.
-
objname Name of the documented object, excluding the module parts.
-
fullname Full name of the documented object, including module and class parts.
-
module Name of the module the documented object belongs to.
-
class Name of the class the documented object belongs to. Only available for methods and attributes.
-
underline A string containing
len(full_name) * '='.
-
members List containing names of all members of the module or class. Only available for modules and classes.
-
functions List containing names of “public” functions in the module. Here, “public” here means that the name does not start with an underscore. Only available for modules.
-
classes List containing names of “public” classes in the module. Only available for modules.
-
exceptions List containing names of “public” exceptions in the module. Only available for modules.
-
methods List containing names of “public” methods in the class. Only available for classes.
-
attributes List containing names of “public” attributes in the class. Only available for classes.
Note
You can use the autosummary directive in the stub pages.
Stub pages are generated also based on these directives.
sphinx.ext.doctest – Test snippets in the documentation
This extension allows you to test snippets in the documentation in a natural way. It works by collecting specially-marked up code blocks and running them as doctest tests.
Within one document, test code is partitioned in groups, where each group consists of:
- zero or more setup code blocks (e.g. importing the module to test)
- one or more test blocks
When building the docs with the doctest builder, groups are collected for
each document and run one after the other, first executing setup code blocks,
then the test blocks in the order they appear in the file.
There are two kinds of test blocks:
- doctest-style blocks mimic interactive sessions by interleaving Python code (including the interpreter prompt) and output.
- code-output-style blocks consist of an ordinary piece of Python code, and optionally, a piece of output for that code.
The doctest extension provides four directives. The group argument is
interpreted as follows: if it is empty, the block is assigned to the group named
default. If it is *, the block is assigned to all groups (including the
default group). Otherwise, it must be a comma-separated list of group
names.
-
.. testsetup::[group] A setup code block. This code is not shown in the output for other builders, but executed before the doctests of the group(s) it belongs to.
-
.. testcleanup::[group] A cleanup code block. This code is not shown in the output for other builders, but executed after the doctests of the group(s) it belongs to.
New in version 1.1.
-
.. doctest::[group] A doctest-style code block. You can use standard
doctestflags for controlling how actual output is compared with what you give as output. By default, these options are enabled:ELLIPSIS(allowing you to put ellipses in the expected output that match anything in the actual output),IGNORE_EXCEPTION_DETAIL(not comparing tracebacks),DONT_ACCEPT_TRUE_FOR_1(by default, doctest accepts “True” in the output where “1” is given – this is a relic of pre-Python 2.2 times).This directive supports two options:
hide, a flag option, hides the doctest block in other builders. By default it is shown as a highlighted doctest block.options, a string option, can be used to give a comma-separated list of doctest flags that apply to each example in the tests. (You still can give explicit flags per example, with doctest comments, but they will show up in other builders too.)
Note that like with standard doctests, you have to use
<BLANKLINE>to signal a blank line in the expected output. The<BLANKLINE>is removed when building presentation output (HTML, LaTeX etc.).Also, you can give inline doctest options, like in doctest:
>>> datetime.date.now()   # doctest: +SKIP
datetime.date(2008, 1, 1)
They will be respected when the test is run, but stripped from presentation output.
-
.. testcode::[group] A code block for a code-output-style test.
This directive supports one option:
hide, a flag option, hides the code block in other builders. By default it is shown as a highlighted code block.
Note
Code in a
testcodeblock is always executed all at once, no matter how many statements it contains. Therefore, output will not be generated for bare expressions – useprint. Example:.. testcode:: 1+1 # this will give no output! print 2+2 # this will give output .. testoutput:: 4
Also, please be aware that since the doctest module does not support mixing regular output and an exception message in the same snippet, this applies to testcode/testoutput as well.
-
.. testoutput::[group] The corresponding output, or the exception message, for the last
testcodeblock.This directive supports two options:
hide, a flag option, hides the output block in other builders. By default it is shown as a literal block without highlighting.options, a string option, can be used to give doctest flags (comma-separated) just like in normal doctest blocks.
Example:
.. testcode::

   print 'Output     text.'

.. testoutput::
   :hide:
   :options: -ELLIPSIS, +NORMALIZE_WHITESPACE

   Output text.
The following is an example for the usage of the directives. The test via
doctest and the test via testcode and testoutput are
equivalent.
The parrot module
=================

.. testsetup:: *

   import parrot

The parrot module is a module about parrots.

Doctest example:

.. doctest::

   >>> parrot.voom(3000)
   This parrot wouldn't voom if you put 3000 volts through it!

Test-Output example:

.. testcode::

   parrot.voom(3000)

This would output:

.. testoutput::

   This parrot wouldn't voom if you put 3000 volts through it!
There are also these config values for customizing the doctest extension:
sphinx.ext.intersphinx – Link to other projects’ documentation
New in version 0.5.
This extension can generate automatic links to the documentation of objects in other projects.
Usage is simple: whenever Sphinx encounters a cross-reference that has no
matching target in the current documentation set, it looks for targets in the
documentation sets configured in :confval:`intersphinx_mapping`. A reference
like :py:class:`zipfile.ZipFile` can then link to the Python documentation
for the ZipFile class, without you having to specify where it is located
exactly.
When using the “new” format (see below), you can even force lookup in a foreign
set by prefixing the link target appropriately. A link like :ref:`comparison
manual <python:comparisons>` will then link to the label “comparisons” in the
doc set “python”, if it exists.
Behind the scenes, this works as follows:
- Each Sphinx HTML build creates a file named
objects.invthat contains a mapping from object names to URIs relative to the HTML set’s root. - Projects using the Intersphinx extension can specify the location of such mapping files in the :confval:`intersphinx_mapping` config value. The mapping will then be used to resolve otherwise missing references to objects into links to the other documentation.
- By default, the mapping file is assumed to be at the same location as the rest of the documentation; however, the location of the mapping file can also be specified individually, e.g. if the docs should be buildable without Internet access.
To use intersphinx linking, add 'sphinx.ext.intersphinx' to your
:confval:`extensions` config value, and use these new config values to activate
linking:
Math support in Sphinx
New in version 0.5.
Since mathematical notation isn’t natively supported by HTML in any way, Sphinx supports math in documentation with several extensions.
The basic math support is contained in sphinx.ext.mathbase. Other math
support extensions should, if possible, reuse that support too.
Note
mathbase is not meant to be added to the :confval:`extensions` config
value, instead, use either sphinx.ext.pngmath or
sphinx.ext.mathjax as described below.
The input language for mathematics is LaTeX markup. This is the de-facto standard for plain-text math notation and has the added advantage that no further translation is necessary when building LaTeX output.
mathbase defines these new markup elements:
-
:math: Role for inline math. Use like this:
Since Pythagoras, we know that :math:`a^2 + b^2 = c^2`.
-
.. math:: Directive for displayed math (math that takes the whole line for itself).
The directive supports multiple equations, which should be separated by a blank line:
.. math::

   (a + b)^2 = a^2 + 2ab + b^2

   (a - b)^2 = a^2 - 2ab + b^2
In addition, each single equation is set within a
splitenvironment, which means that you can have multiple aligned lines in an equation, aligned at&and separated by\\:.. math:: (a + b)^2 &= (a + b)(a + b) \\ &= a^2 + 2ab + b^2
For more details, look into the documentation of the AmSMath LaTeX package.
When the math is only one line of text, it can also be given as a directive argument:
.. math:: (a + b)^2 = a^2 + 2ab + b^2
Normally, equations are not numbered. If you want your equation to get a number, use the
labeloption. When given, it selects an internal label for the equation, by which it can be cross-referenced, and causes an equation number to be issued. Seeeqreffor an example. The numbering style depends on the output format.There is also an option
nowrapthat prevents any wrapping of the given math in a math environment. When you give this option, you must make sure yourself that the math is properly set up. For example:.. math:: :nowrap: \begin{eqnarray} y & = & ax^2 + bx + c \\ f(x) & = & x^2 + 2xy + y^2 \end{eqnarray}
-
:eq: Role for cross-referencing equations via their label. This currently works only within the same document. Example:
.. math:: e^{i\pi} + 1 = 0
   :label: euler

Euler's identity, equation :eq:`euler`, was elected one of the most
beautiful mathematical formulas.
sphinx.ext.pngmath – Render math as PNG images
This extension renders math via LaTeX and dvipng into PNG images. This of course means that the computer where the docs are built must have both programs available.
There are various config values you can set to influence how the images are built:
sphinx.ext.mathjax – Render math via JavaScript
New in version 1.1.
This extension puts math as-is into the HTML files. The JavaScript package MathJax is then loaded and transforms the LaTeX markup to readable math live in the browser.
Because MathJax (and the necessary fonts) is very large, it is not included in Sphinx.
sphinx.ext.jsmath – Render math via JavaScript
This extension works just as the MathJax extension does, but uses the older package jsMath. It provides this config value:
sphinx.ext.graphviz – Add Graphviz graphs
New in version 0.6.
This extension allows you to embed Graphviz graphs in your documents.
It adds these directives:
-
.. graphviz:: Directive to embed graphviz code. The input code for
dotis given as the content. For example:.. graphviz:: digraph foo { "bar" -> "baz"; }
In HTML output, the code will be rendered to a PNG or SVG image (see :confval:`graphviz_output_format`). In LaTeX output, the code will be rendered to an embeddable PDF file.
You can also embed external dot files, by giving the file name as an argument to
graphvizand no additional content:.. graphviz:: external.dot
As for all file references in Sphinx, if the filename is absolute, it is taken as relative to the source directory.
Changed in version 1.1: Added support for external files.
-
.. graph:: Directive for embedding a single undirected graph. The name is given as a directive argument, the contents of the graph are the directive content. This is a convenience directive to generate
graph <name> { <content> }.For example:
.. graph:: foo

   "bar" -- "baz";
-
.. digraph:: Directive for embedding a single directed graph. The name is given as a directive argument, the contents of the graph are the directive content. This is a convenience directive to generate
digraph <name> { <content> }.For example:
.. digraph:: foo

   "bar" -> "baz" -> "quux";
New in version 1.0: All three directives support an alt option that determines the image’s
alternate text for HTML output. If not given, the alternate text defaults to
the graphviz code.
New in version 1.1: All three directives support an inline flag that controls paragraph
breaks in the output. When set, the graph is inserted into the current
paragraph. If the flag is not given, paragraph breaks are introduced before
and after the image (the default).
New in version 1.1: All three directives support a caption option that can be used to give a
caption to the diagram. Naturally, diagrams marked as “inline” cannot have a
caption.
There are also these new config values:
sphinx.ext.inheritance_diagram – Include inheritance diagrams
New in version 0.6.
This extension allows you to include inheritance diagrams, rendered via the
Graphviz extension.
It adds this directive:
-
.. inheritance-diagram:: This directive has one or more arguments, each giving a module or class name. Class names can be unqualified; in that case they are taken to exist in the currently described module (see
py:module).For each given class, and each class in each given module, the base classes are determined. Then, from all classes and their base classes, a graph is generated which is then rendered via the graphviz extension to a directed graph.
This directive supports an option called
partsthat, if given, must be an integer, advising the directive to remove that many parts of module names from the displayed names. (For example, if all your class names start withlib., you can give:parts: 1to remove that prefix from the displayed node names.)It also supports a
private-basesflag option; if given, private base classes (those whose name starts with_) will be included.Changed in version 1.1: Added
private-basesoption; previously, all bases were always included.
New config values are:
sphinx.ext.refcounting – Keep track of reference counting behavior
sphinx.ext.ifconfig – Include content based on configuration
This extension is quite simple, and features only one directive:
-
.. ifconfig:: Include content of the directive only if the Python expression given as an argument is
True, evaluated in the namespace of the project’s configuration (that is, all registered variables fromconf.pyare available).For example, one could write
.. ifconfig:: releaselevel in ('alpha', 'beta', 'rc')

   This stuff is only included in the built docs for unstable versions.
To make a custom config value known to Sphinx, use
add_config_value()in the setup function inconf.py, e.g.:def setup(app): app.add_config_value('releaselevel', '', True)The second argument is the default value, the third should always be
Truefor such values (it selects if Sphinx re-reads the documents if the value changes).
sphinx.ext.coverage – Collect doc coverage stats
This extension features one additional builder, the CoverageBuilder.
-
class
sphinx.ext.coverage.CoverageBuilder To use this builder, activate the coverage extension in your configuration file and give
-b coverageon the command line.
Several new configuration values can be used to specify what the builder should check:
sphinx.ext.todo – Support for todo items
New in version 0.5.
There are two additional directives when using this extension:
-
.. todo:: Use this directive like, for example,
note.It will only show up in the output if :confval:`todo_include_todos` is true.
-
.. todolist:: This directive is replaced by a list of all todo directives in the whole documentation, if :confval:`todo_include_todos` is true.
There is also an additional config value:
sphinx.ext.extlinks – Markup to shorten external links
New in version 1.0.
This extension is meant to help with the common pattern of having many external links that point to URLs on one and the same site, e.g. links to bug trackers, version control web interfaces, or simply subpages in other websites. It does so by providing aliases to base URLs, so that you only need to give the subpage name when creating a link.
Let’s assume that you want to include many links to issues at the Sphinx
tracker, at http://bitbucket.org/birkenfeld/sphinx/issue/num. Typing
this URL again and again is tedious, so you can use extlinks
to avoid repeating yourself.
The extension adds one new config value:
Note
Since links are generated from the role in the reading stage, they appear as
ordinary links to e.g. the linkcheck builder.
sphinx.ext.viewcode – Add links to highlighted source code
New in version 1.0.
This extension looks at your Python object descriptions (.. class::,
.. function:: etc.) and tries to find the source files where the objects are
contained. When found, a separate HTML page will be output for each module with
a highlighted version of the source code, and a link will be added to all object
descriptions that leads to the source code of the described object. A link back
from the source to the description will also be inserted.
There are currently no configuration values for this extension; you just need to
add 'sphinx.ext.viewcode' to your :confval:`extensions` value for it to work.
sphinx.ext.oldcmarkup – Compatibility extension for old C markup
New in version 1.0.
This extension is a transition helper for projects that used the old
(pre-domain) C markup, i.e. the directives like cfunction and roles like
cfunc. Since the introduction of domains, they must be called by their
fully-qualified name (c:function and c:func, respectively) or, with the
default domain set to c, by their new name (function and func).
(See The C Domain for the details.)
If you activate this extension, it will register the old names, and you can use them like before Sphinx 1.0. The directives are:
cfunctioncmembercmacroctypecvar
The roles are:
cdatacfunccmacroctype
However, it is advised to migrate to the new markup – this extension is a compatibility convenience and will disappear in a future version of Sphinx.
Third-party extensions
You can find several extensions contributed by users in the Sphinx Contrib repository. It is open for anyone who wants to maintain an extension publicly; just send a short message asking for write permissions.
There are also several extensions hosted elsewhere. The Wiki at BitBucket maintains a list of those.
If you write an extension that you think others will find useful or you think should be included as a part of Sphinx, please write to the project mailing list (join here).
Where to put your own extensions?
Extensions local to a project should be put within the project’s directory
structure. Set Python’s module search path, sys.path, accordingly so that
Sphinx can find them.
E.g., if your extension foo.py lies in the exts subdirectory of the
project root, put into conf.py:
import sys, os

sys.path.append(os.path.abspath('exts'))

extensions = ['foo']
You can also install extensions anywhere else on sys.path, e.g. in the
site-packages directory.
Sphinx Web Support
New in version 1.1.
Sphinx provides a Python API to easily integrate Sphinx documentation into your web application. To learn more read the Web Support Quick Start.
Web Support Quick Start
Building Documentation Data
To make use of the web support package in your application you’ll need to build
the data it uses. This data includes pickle files representing documents,
search indices, and node data that is used to track where comments and other
things are in a document. To do this you will need to create an instance of the
WebSupport class and call its build() method:
from sphinx.websupport import WebSupport

support = WebSupport(srcdir='/path/to/rst/sources/',
                     builddir='/path/to/build/outdir',
                     search='xapian')

support.build()
This will read reStructuredText sources from srcdir and place the necessary data in builddir. The builddir will contain two sub-directories: one named “data” that contains all the data needed to display documents, search through documents, and add comments to documents. The other directory will be called “static” and contains static files that should be served from “/static”.
Note
If you wish to serve static files from a path other than “/static”, you can
do so by providing the staticdir keyword argument when creating the
WebSupport object.
Integrating Sphinx Documents Into Your Webapp
Now that the data is built, it’s time to do something useful with it. Start off
by creating a WebSupport object for your application:
from sphinx.websupport import WebSupport

support = WebSupport(datadir='/path/to/the/data',
                     search='xapian')
You’ll only need one of these for each set of documentation you will be working
with. You can then call it’s get_document() method to access
individual documents:
contents = support.get_document('contents')
This will return a dictionary containing the following items:
- body: The main body of the document as HTML
- sidebar: The sidebar of the document as HTML
- relbar: A div containing links to related documents
- title: The title of the document
- css: Links to css files used by Sphinx
- js: Javascript containing comment options
This dict can then be used as context for templates. The goal is to be easy to integrate with your existing templating system. An example using Jinja2 is:
{%- extends "layout.html" %}

{%- block title %}
    {{ document.title }}
{%- endblock %}

{% block css %}
    {{ super() }}
    {{ document.css|safe }}
    <link rel="stylesheet" href="/static/websupport-custom.css" type="text/css">
{% endblock %}

{%- block js %}
    {{ super() }}
    {{ document.js|safe }}
{%- endblock %}

{%- block relbar %}
    {{ document.relbar|safe }}
{%- endblock %}

{%- block body %}
    {{ document.body|safe }}
{%- endblock %}

{%- block sidebar %}
    {{ document.sidebar|safe }}
{%- endblock %}
Authentication
To use certain features such as voting, it must be possible to authenticate
users. The details of the authentication are left to your application. Once a
user has been authenticated you can pass the user’s details to certain
WebSupport methods using the username and moderator keyword
arguments. The web support package will store the username with comments and
votes. The only caveat is that if you allow users to change their username you
must update the websupport package’s data:
support.update_username(old_username, new_username)
username should be a unique string which identifies a user, and moderator should be a boolean representing whether the user has moderation privilieges. The default value for moderator is False.
An example Flask function that checks whether a user is logged in and then retrieves a document is:
from sphinx.websupport.errors import *

@app.route('/<path:docname>')
def doc(docname):
    username = g.user.name if g.user else ''
    moderator = g.user.moderator if g.user else False
    try:
        document = support.get_document(docname, username, moderator)
    except DocumentNotFoundError:
        abort(404)
    return render_template('doc.html', document=document)
The first thing to notice is that the docname is just the request path. This
makes accessing the correct document easy from a single view. If the user is
authenticated, then the username and moderation status are passed along with the
docname to get_document(). The web support package will then
add this data to the COMMENT_OPTIONS that are used in the template.
Note
This only works works if your documentation is served from your document root. If it is served from another directory, you will need to prefix the url route with that directory, and give the docroot keyword argument when creating the web support object:
support = WebSupport(..., docroot='docs')

@app.route('/docs/<path:docname>')
Performing Searches
To use the search form built-in to the Sphinx sidebar, create a function to
handle requests to the url ‘search’ relative to the documentation root. The
user’s search query will be in the GET parameters, with the key q. Then use
the get_search_results() method to retrieve
search results. In Flask that would be like this:
@app.route('/search')
def search():
    q = request.args.get('q')
    document = support.get_search_results(q)
    return render_template('doc.html', document=document)
Note that we used the same template to render our search results as we did to
render our documents. That’s because get_search_results()
returns a context dict in the same format that get_document()
does.
Comments & Proposals
Now that this is done it’s time to define the functions that handle the AJAX
calls from the script. You will need three functions. The first function is
used to add a new comment, and will call the web support method
add_comment():
@app.route('/docs/add_comment', methods=['POST'])
def add_comment():
    parent_id = request.form.get('parent', '')
    node_id = request.form.get('node', '')
    text = request.form.get('text', '')
    proposal = request.form.get('proposal', '')
    username = g.user.name if g.user is not None else 'Anonymous'
    comment = support.add_comment(text, node_id='node_id',
                                  parent_id='parent_id',
                                  username=username, proposal=proposal)
    return jsonify(comment=comment)
You’ll notice that both a parent_id and node_id are sent with the
request. If the comment is being attached directly to a node, parent_id
will be empty. If the comment is a child of another comment, then node_id
will be empty. Then next function handles the retrieval of comments for a
specific node, and is aptly named
get_data():
@app.route('/docs/get_comments')
def get_comments():
    username = g.user.name if g.user else None
    moderator = g.user.moderator if g.user else False
    node_id = request.args.get('node', '')
    data = support.get_data(node_id, username, moderator)
    return jsonify(**data)
The final function that is needed will call process_vote(),
and will handle user votes on comments:
@app.route('/docs/process_vote', methods=['POST'])
def process_vote():
    if g.user is None:
        abort(401)
    comment_id = request.form.get('comment_id')
    value = request.form.get('value')
    if value is None or comment_id is None:
        abort(400)
    support.process_vote(comment_id, g.user.id, value)
    return "success"
Comment Moderation
By default, all comments added through add_comment() are
automatically displayed. If you wish to have some form of moderation, you can
pass the displayed keyword argument:
comment = support.add_comment(text, node_id='node_id',
                              parent_id='parent_id',
                              username=username, proposal=proposal,
                              displayed=False)
You can then create a new view to handle the moderation of comments. It will be called when a moderator decides a comment should be accepted and displayed:
@app.route('/docs/accept_comment', methods=['POST'])
def accept_comment():
    moderator = g.user.moderator if g.user else False
    comment_id = request.form.get('id')
    support.accept_comment(comment_id, moderator=moderator)
    return 'OK'
Rejecting comments happens via comment deletion.
To perform a custom action (such as emailing a moderator) when a new comment is
added but not displayed, you can pass callable to the WebSupport
class when instantiating your support object:
def moderation_callback(comment):
    """Do something..."""

support = WebSupport(..., moderation_callback=moderation_callback)
The moderation callback must take one argument, which will be the same comment
dict that is returned by add_comment().
The WebSupport Class
-
class
sphinx.websupport.WebSupport The main API class for the web support package. All interactions with the web support package should occur through this class.
The class takes the following keyword arguments:
- srcdir
- The directory containing reStructuredText source files.
- builddir
- The directory that build data and static files should be placed in. This
should be used when creating a
WebSupportobject that will be used to build data. - datadir
- The directory that the web support data is in. This should be used when
creating a
WebSupportobject that will be used to retrieve data. - search
- This may contain either a string (e.g. ‘xapian’) referencing a built-in
search adapter to use, or an instance of a subclass of
BaseSearch. - storage
- This may contain either a string representing a database uri, or an
instance of a subclass of
StorageBackend. If this is not provided, a new sqlite database will be created. - moderation_callback
- A callable to be called when a new comment is added that is not displayed. It must accept one argument: a dictionary representing the comment that was added.
- staticdir
- If static files are served from a location besides
'/static', this should be a string with the name of that location (e.g.'/static_files'). - docroot
- If the documentation is not served from the base path of a URL, this
should be a string specifying that path (e.g.
'docs').
Methods
Search Adapters
To create a custom search adapter you will need to subclass the
BaseSearch class. Then create an instance of the new class and pass
that as the search keyword argument when you create the WebSupport
object:
support = WebSupport(srcdir=srcdir,
                     builddir=builddir,
                     search=MySearch())
For more information about creating a custom search adapter, please see the
documentation of the BaseSearch class below.
-
class
sphinx.websupport.search.BaseSearch Defines an interface for search adapters.
BaseSearch Methods
The following methods are defined in the BaseSearch class. Some methods do not need to be overridden, but some (add_document()andhandle_query()) must be overridden in your subclass. For a working example, look at the built-in adapter for whoosh.
Storage Backends
To create a custom storage backend you will need to subclass the
StorageBackend class. Then create an instance of the new class and
pass that as the storage keyword argument when you create the
WebSupport object:
support = WebSupport(srcdir=srcdir,
                     builddir=builddir,
                     storage=MyStorage())
For more information about creating a custom storage backend, please see the
documentation of the StorageBackend class below.
-
class
sphinx.websupport.storage.StorageBackend Defines an interface for storage backends.
StorageBackend Methods
Sphinx FAQ
This is a list of Frequently Asked Questions about Sphinx. Feel free to suggest new entries!
How do I...
- ... create PDF files without LaTeX?
- You can use rst2pdf version 0.12 or greater which comes with built-in Sphinx integration. See the Available builders section for details.
- ... get section numbers?
- They are automatic in LaTeX output; for HTML, give a
:numbered:option to thetoctreedirective where you want to start numbering. - ... customize the look of the built HTML files?
- Use themes, see HTML theming support.
- ... add global substitutions or includes?
- Add them in the :confval:`rst_epilog` config value.
- ... display the whole TOC tree in the sidebar?
- Use the
toctreecallable in a custom layout template, probably in thesidebartocblock. - ... write my own extension?
- See the extension tutorial.
- ... convert from my existing docs using MoinMoin markup?
- The easiest way is to convert to xhtml, then convert xhtml to reST. You’ll still need to mark up classes and such, but the headings and code examples come through cleanly.
Using Sphinx with...
- Read the Docs
- http://readthedocs.org is a documentation hosting service based around Sphinx. They will host sphinx documentation, along with supporting a number of other features including version support, PDF generation, and more. The Getting Started guide is a good place to start.
- Epydoc
- There’s a third-party extension providing an api role which refers to Epydoc’s API docs for a given identifier.
- Doxygen
- Michael Jones is developing a reST/Sphinx bridge to doxygen called breathe.
- SCons
- Glenn Hutchings has written a SCons build script to build Sphinx documentation; it is hosted here: https://bitbucket.org/zondo/sphinx-scons
- PyPI
- Jannis Leidel wrote a setuptools command that automatically uploads Sphinx documentation to the PyPI package documentation area at http://packages.python.org/.
- GitHub Pages
- Directories starting with underscores are ignored by default which breaks static files in Sphinx. GitHub’s preprocessor can be disabled to support Sphinx HTML output properly.
- MediaWiki
- See https://bitbucket.org/kevindunn/sphinx-wiki, a project by Kevin Dunn.
- Google Analytics
You can use a custom
layout.htmltemplate, like this:{% extends "!layout.html" %} {%- block extrahead %} {{ super() }} <script type="text/javascript"> var _gaq = _gaq || []; _gaq.push(['_setAccount', 'XXX account number XXX']); _gaq.push(['_trackPageview']); </script> {% endblock %} {% block footer %} {{ super() }} <div class="footer">This page uses <a href="http://analytics.google.com/"> Google Analytics</a> to collect statistics. You can disable it by blocking the JavaScript coming from www.google-analytics.com. <script type="text/javascript"> (function() { var ga = document.createElement('script'); ga.src = ('https:' == document.location.protocol ? 'https://ssl' : 'http://www') + '.google-analytics.com/ga.js'; ga.setAttribute('async', 'true'); document.documentElement.firstChild.appendChild(ga); })(); </script> </div> {% endblock %}
Epub info
The epub builder is currently in an experimental stage. It has only been tested with the Sphinx documentation itself. If you want to create epubs, here are some notes:
Split the text into several files. The longer the individual HTML files are, the longer it takes the ebook reader to render them. In extreme cases, the rendering can take up to one minute.
Try to minimize the markup. This also pays in rendering time.
For some readers you can use embedded or external fonts using the CSS
@font-facedirective. This is extremely useful for code listings which are often cut at the right margin. The default Courier font (or variant) is quite wide and you can only display up to 60 characters on a line. If you replace it with a narrower font, you can get more characters on a line. You may even use FontForge and create narrow variants of some free font. In my case I get up to 70 characters on a line.You may have to experiment a little until you get reasonable results.
Test the created epubs. You can use several alternatives. The ones I am aware of are Epubcheck, Calibre, FBreader (although it does not render the CSS), and Bookworm. For bookworm you can download the source from http://code.google.com/p/threepress/ and run your own local server.
Large floating divs are not displayed properly. If they cover more than one page, the div is only shown on the first page. In that case you can copy the
epub.cssfrom thesphinx/themes/epub/static/directory to your local_static/directory and remove the float settings.Files that are inserted outside of the
toctreedirective must be manually included. This sometimes applies to appendixes, e.g. the glossary or the indices. You can add them with the :confval:`epub_post_files` option.
Texinfo info
The Texinfo builder is currently in an experimental stage but has successfully been used to build the documentation for both Sphinx and Python. The intended use of this builder is to generate Texinfo that is then processed into Info files.
There are two main programs for reading Info files, info and GNU Emacs. The
info program has less features but is available in most Unix environments
and can be quickly accessed from the terminal. Emacs provides better font and
color display and supports extensive customization (of course).
Displaying Links
One noticeable problem you may encounter with the generated Info files is how references are displayed. If you read the source of an Info file, a reference to this section would look like:
* note Displaying Links: target-id
In the stand-alone reader, info, references are displayed just as they
appear in the source. Emacs, on the other-hand, will by default replace
\*note: with see and hide the target-id. For example:
The exact behavior of how Emacs displays references is dependent on the variable
Info-hide-note-references. If set to the value of hide, Emacs will hide
both the \*note: part and the target-id. This is generally the best way
to view Sphinx-based documents since they often make frequent use of links and
do not take this limitation into account. However, changing this variable
affects how all Info documents are displayed and most due take this behavior
into account.
If you want Emacs to display Info files produced by Sphinx using the value
hide for Info-hide-note-references and the default value for all other
Info files, try adding the following Emacs Lisp code to your start-up file,
~/.emacs.d/init.el.
(defadvice info-insert-file-contents (after
                                      sphinx-info-insert-file-contents
                                      activate)
  "Hack to make `Info-hide-note-references' buffer-local and
automatically set to `hide' iff it can be determined that this file
was created from a Texinfo file generated by Docutils or Sphinx."
  (set (make-local-variable 'Info-hide-note-references)
       (default-value 'Info-hide-note-references))
  (save-excursion
    (save-restriction
      (widen) (goto-char (point-min))
      (when (re-search-forward
             "^Generated by \\(Sphinx\\|Docutils\\)"
             (save-excursion (search-forward "\x1f" nil t)) t)
        (set (make-local-variable 'Info-hide-note-references)
             'hide)))))
Notes
The following notes may be helpful if you want to create Texinfo files:
Each section corresponds to a different
nodein the Info file.Colons (
:) cannot be properly escaped in menu entries and xrefs. They will be replaced with semicolons (;).In the HTML and Tex output, the word
seeis automatically inserted before all xrefs.Links to external Info files can be created using the somewhat official URI scheme
info. For example:info:Texinfo#makeinfo_options
which produces:
Inline markup appears as follows in Info:
- strong – *strong*
- emphasis – _emphasis_
- literal – `literal’
It is possible to change this behavior using the Texinfo command
@definfoenclose. For example, to make inline markup more closely resemble reST, add the following to yourconf.py:texinfo_elements = {'preamble': """\ @definfoenclose strong,**,** @definfoenclose emph,*,* @definfoenclose code,`@w{}`,`@w{}` """}
Glossary
- builder
A class (inheriting from
Builder) that takes parsed documents and performs an action on them. Normally, builders translate the documents to an output format, but it is also possible to use the builder builders that e.g. check for broken links in the documentation, or build coverage information.See Available builders for an overview over Sphinx’ built-in builders.
- configuration directory
- The directory containing
conf.py. By default, this is the same as the source directory, but can be set differently with the -c command-line option. - directive
A reStructuredText markup element that allows marking a block of content with special meaning. Directives are supplied not only by docutils, but Sphinx and custom extensions can add their own. The basic directive syntax looks like this:
.. directivename:: argument ...
   :option: value

   Content of the directive.
See 指令 for more information.
- document name
Since reST source files can have different extensions (some people like
.txt, some like.rst– the extension can be configured with :confval:`source_suffix`) and different OSes have different path separators, Sphinx abstracts them: document names are always relative to the source directory, the extension is stripped, and path separators are converted to slashes. All values, parameters and such referring to “documents” expect such document names.Examples for document names are
index,library/zipfile, orreference/datamodel/types. Note that there is no leading or trailing slash.- domain
A domain is a collection of markup (reStructuredText directives and roles) to describe and link to objects belonging together, e.g. elements of a programming language. Directive and role names in a domain have names like
domain:name, e.g.py:function.Having domains means that there are no naming problems when one set of documentation wants to refer to e.g. C++ and Python classes. It also means that extensions that support the documentation of whole new languages are much easier to write. For more information about domains, see the chapter Sphinx Domains.
- environment
- A structure where information about all documents under the root is saved, and used for cross-referencing. The environment is pickled after the parsing stage, so that successive runs only need to read and parse new and changed documents.
- master document
- The document that contains the root
toctreedirective. - object
- The basic building block of Sphinx documentation. Every “object
directive” (e.g.
functionorobject) creates such a block; and most objects can be cross-referenced to. - role
- A reStructuredText markup element that allows marking a piece of text.
Like directives, roles are extensible. The basic syntax looks like this:
:rolename:`content`. See 内联标记 for details. - source directory
- The directory which, including its subdirectories, contains all source files for one Sphinx project.